
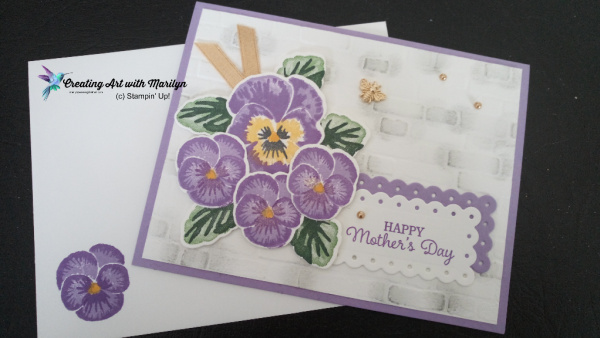
I’m so excited to have the opportunity to be in the second Canada Inks Up Blog Hop. For this Blog Hop we were asked to make a project or card using the upcoming products from the New 2021-2022 Annual Catalogue. I choice to use the Pansy Patch stamp set. If you would like to see what products I used to make this card and the instructions click on read more.
To see the other Stampers in the Blog Hop
- SimplyStampinwithSandra
- Diane Evans – Stampin With Diane Canada
- Pam Milan – Creative Hands 123
- Melva Peters – Stamping With Melva Canada
- Alison Solven – Stamp Crazy With Alison
- Ginny Duncan – Stamping With Ginny (Canada)
- Creative Shawnanigans With Wendy Shaw
- Creating Art With Marilyn (Canada) you are here
- Arlene Ross – whatajmade
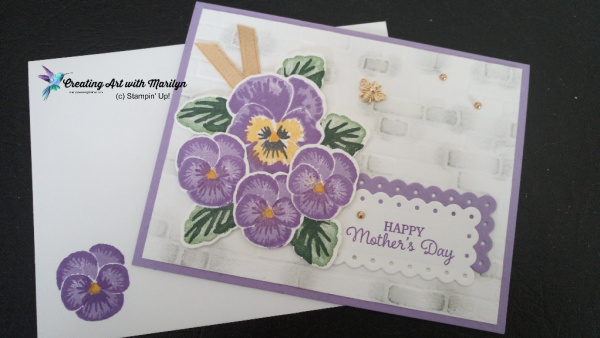
Here is my Mother’s Day card for the Canada Inks Up Blog Hop
Stamps: Pansy Petals, Timeless Tulips
Dies: Pansy Die, Scalloped Contour Dies
Inks: Gorgeous Grape, Highland Heather, So Saffron, Bumblebee, Evening Evergreen, Garden Green, Smokey Slate and Memento Black.
Paper Products: Highland Heather, Basic White.
Other Products: Brick and Mortar Embossing Folder, Gold 1/4″ Ribbon, Bumblebee Trinkets, Metallic Pearls and Wink of Stella.
Instructions to make the Card
- Card base is Highland Heather 8-1/2 x 5-1/2 scored at 4-1/4, using a landscape fold.
- Basic White card stock cut at 4 x 5-1/4 and embossed with the Brick and Mortar embossing folder. Lightly sponge some of the bricks with a sponge dauber using Smokey Slate Ink. Attach this layer to the card base with Stampin Seal.
- For stamping the large pansy, I stamped the large detailed pansy first. (I found it easier to see the different layers doing the detail stamp first) using Gorgeous Grape then stamped the background stamp in Highland Heather. The face of the pansy I stamped in So Saffron then the next layer in Memento Black and the center is stamped in Bumblebee.
- For the small pansy I stamped the detailed layer first in Gorgeous Grape and the background in Highland Heather. The face of the pansy is in Gorgeous Grape and center is Bumblebee.
- The leaves I also found it easier to stamp the darker layer first using Evening Evergreen and the the background in Garden Green.
- Now die cut the pansies and leaves out using the Pansy Dies.
- I assembled the pansies and leaves to the card using dimensionals.
- The sentiment is from the Timeless Tulip stamp set and stamped in Gorgeous Grape and then die cut using the new Scalloped Contours Dies. I also die cut out a Highland Heather layer and then glued them together and then attached to the card using Stampin Seal.
- I folded and tucked a small piece of the Gold 1/4″ ribbon under the pansy cluster using glue dots.
- For a little bling I used the Metallic Gold Pearls and the cute Bumblebee Trinket attaching it with glue dots.
- Using Wink of Stella I brushed a little on the pansy faces.










Very pretty card Marilyn!
Thanks Melva I love Pansies so I was so excited to be able to play with this bundle. More cards to come using this set.
I love the pansy’s. Your card is so pretty.
Thank you Alison. This is my first attempt to play with the Pansy Patch Bundle and it was so much fun. More cards to caome
Great card for the pansies!