

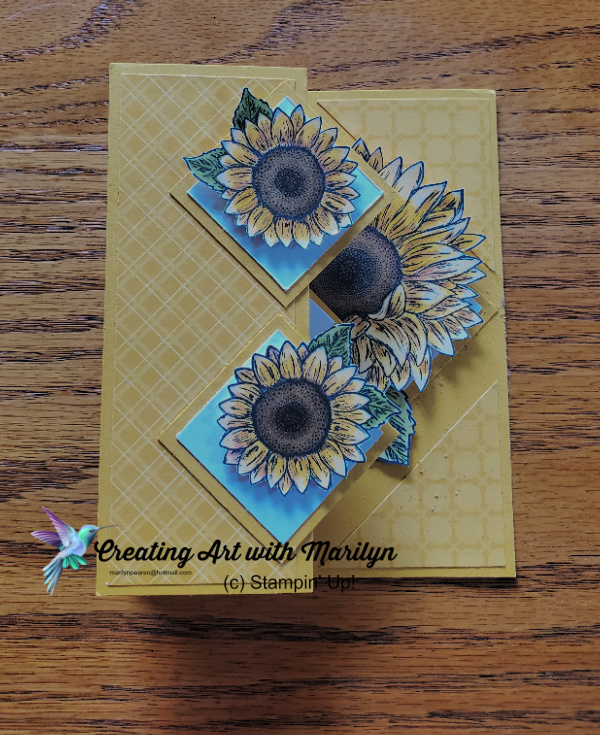

Here are the supplies I used:
Stamps: Celebrate Sunflowers and Peaceful Moments
Paper Products: Bumblebee and Basic White card stock, Bumblebee 6×6 Designer Series Paper Assortment pack
Other Products: Stampin Blend Markers in Dark So Saffron, Dark Daffodil Delight, Dark Cinnamon Cider, Light and Dark Old Olive, Light and Dark Soft Suede and Memento Black Ink
Instructions for cutting and making card:
- Bumblebee card stock
- Card base is 5-1/2 x 8-1/2
- Two pieces cut at 2-3/4 x 2-3/4
- Two pieces cut at 1-3/4 x 1-3/4
- Basic White card stock
- Two pieces cut at 2-1/2 x 2-1/2
- Two pieces cut at 1-1/2 x 1-1/2
- Bumblebee 6×6 Designer Series Assortment Pack
- Three pieces cut at 1-7/8 x 5-1/4
- One different design of 6×6 DSP assortment pack cut at 2 x 2
Instructions to make card
- Cut card base at 5-1/2 x 8-1/2 and score at 2-1/8, 4-1/4
- Fold card in half at the 4-1/4 mark and score and then fold the 2-1/8 score line to make a ‘Z’ fold
- Adhere the three pieces of 1-7/8 x 5-1/4 DSP to the folded panels and also the inside of the card
- Cut the 2 x 2 piece of DSP from corner to corner making two triangles
- Adhere one to the top and the other to the bottom of the right side of the inside of the card.
- Attach the Basic White 2-1/2 x 2-1/2 to the Bumblebee 2-3/4 x 2-3/4 piece of card stock and glue it to the center of the card
- Score the second piece of the 2-3/4 x 2-3/4 from corner to corner and then from the score line cut it at 1/2″ mark
- Score it on both sides to loosen the paper fibres
- Put liquid glue on the 1/2 inch piece and butt it up against the inside of the center of card and fold the card close. This will attach the flap to the middle of the card
- Glue the two pieces of Basic White 1-1/2 x 1-1/2 to the two pieces of 1-3/4 x 1-3/4 card stock
- Fold the card in the ‘Z” position and put a little glue to the attach these to the top and bottom of the front of the card
- Stamp and color the sunflowers. I stamped two small flowers and one of the large one for the inside of the card
- Color the flowers with Stampin Blends in Dark So Saffron, Dark Daffodil Delight, Dark Cinnamon Cider, Light and Dark Old Olive and Light and Dark Soft Suede
- Attach the small sunflowers to the front of the card with dimensionals and then the large sunflower to the inside of the card with dimensionals and the leaves with glue dots
- Stamp the sentiment on the white triangle and glue it to the center flap
Here is a video showing how to construct the card. This is my first time to add a video to my blog so it should be a good laugh, but they say practice makes perfect. Enjoy!
Now hop over to see the other demonstrators great cards


Great card and love your video
Thanks Diane LOL Well we can say there is a video included but I still have alot to learn about making a video and after watching it and yours I know right now I need to move out at little but after three attempts I thought I would try it. More videos to come haha
Great card Marilyn! Can’t wait to CASE! Love the fold!
Thanks Melva, hopefully all the instructions are easy to follow. My video was my third attempt and I think I may have missed a few measurements and steps. I hope to make more videos and include them in my blog lol.
Great card – love the layers and folds!
Wonderful fall card!
Thanks Sandra.
Wow!! What a great fun fold!