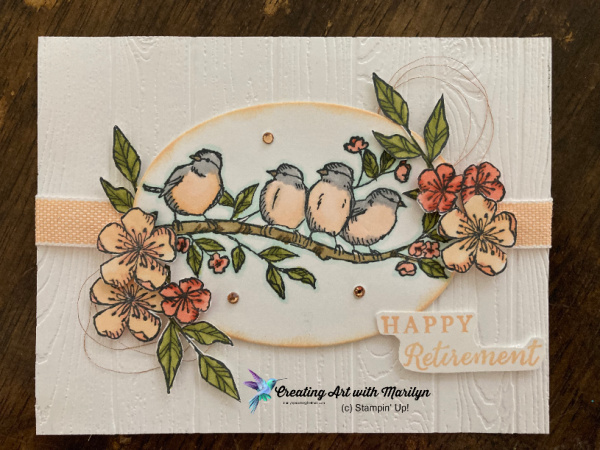
Paper Products: Basic White, Polished Pink, Water Colour paper, Hand Penned DSP
Other Products: Versa Mark, Gold Embossing Powder, Water Painter brushes, Stampin Seal and dimensionals.
Instructions to make the card
Card base is Basic White cut at 8-1/2 x 5-1/2 scored at 4-1/4
Layer 2 is Polish Pink cut at 5-1/4 x 4
DSP layer is 3-7/8 x 5-1/8
Stamp Hand Penned Stamp on water colour paper in gold embossing powder
Water colour flowers in Polish Pink ink and the leaves in Soft Succulent ink
Die cut the flower images using the Penned Flower die
Lay the Polished Pink card stock layer over the Basic White card base and using the smallest layering die, die cut out both layer together
Using the next larger die, cut out the die on the DSP layer
Attach the layers using liquid glue
Lightly trace the cut out image onto the inside of the card as a guide for placement of your sentiment
Heat emboss sentiment in Gold embossing powder
Stamp the flower image in the corner of the card with Gold embossing powder and water colour the flowers
Attach the die cut flowers with dimensionals to the corners of the card being careful not to place any on the edges of the flower that will be appearing over the sentiment and inside of the card.
Here is another card using Flirty Flamingo and Soft Succulent Ink
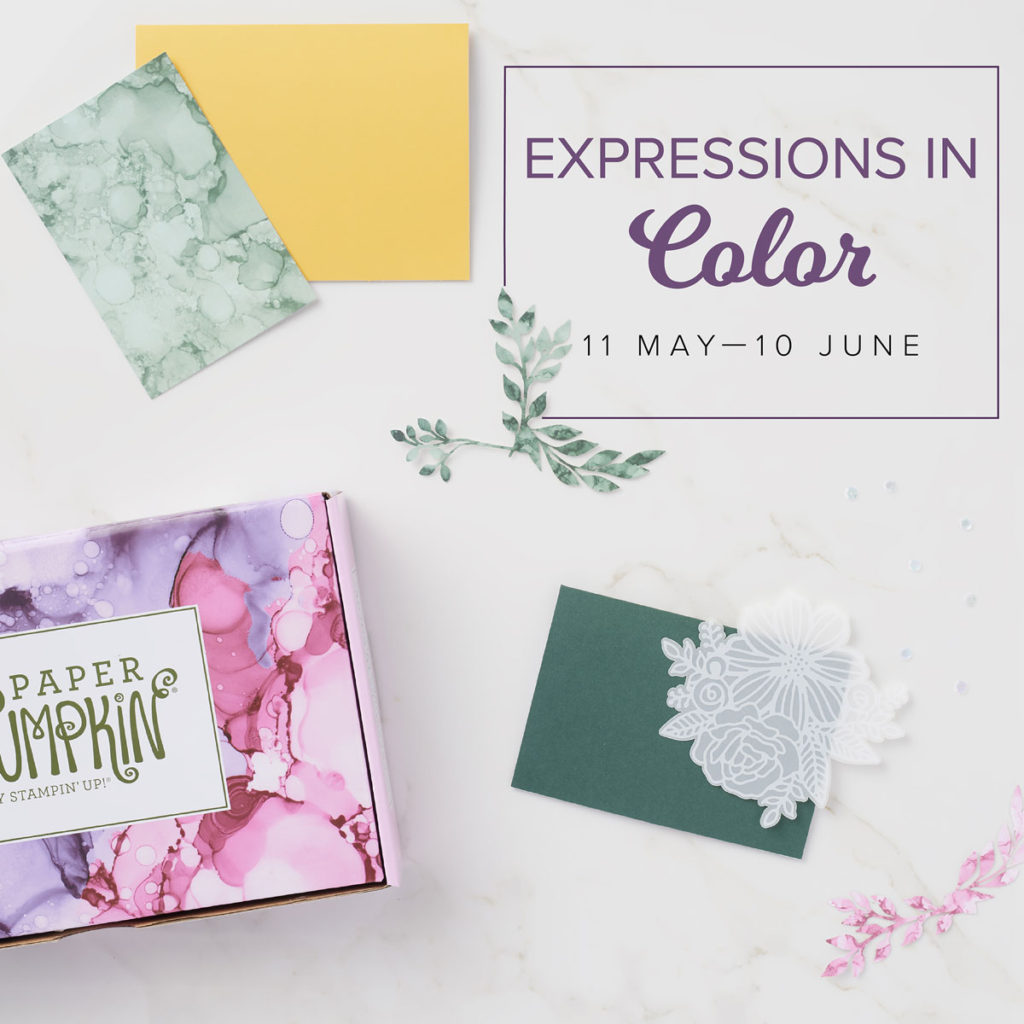
Oh My Gosh have you seen what the June Paper Pumpkin is going to be! Paper Pumpkin will be coordinating with the Expression in Ink from the new Annual Catalogue. This month’s incredible kit is featuring three new 2021-23 In Colours and contains enough elements to create nine cards (3 each of 3 designs) and includes trendy alcohol ink-stained paper pieces, an exclusive stamp set, and not one, but two Stampin’ Ink Spots! And, it all comes in a beautiful colourful collectible box. This is a super affordable way to get acquainted with the new colours in Stampin’ Up’s current line and a great way to be introduced into card making. And if you love it all, you can pair this kit up with products from the coordinating Expressions In Ink Suite. Coordinating colours are Bumblebee, Evening Evergreen, Fresh Freesia, Polished Pink.The cost of the kits are $30. You can subscribe to Paper Pumpkin and receive a kit each month. Subscribe to Paper Pumpkin between May 11 and June 10th to get your Expressions in Colour paperpumpkin.com/en-ca
What is Paper Pumpkin? Paper Pumpkin is our monthly One-Stop Box™ that offers a unique variety of paper projects for subscribers of any skill level to enjoy! These thoughtfully-themed and all-inclusive craft kits encourage Stampin’ Up! customers to explore their creativity, try new techniques, and discover their potential in paper crafting.
Posted inUncategorized|Comments Off on June Paper Pumpkin Kit
Do you want to build your collection of the new 2021-2023 In-Colour products on a budget? You can join my 2021-2023 In Color Club. You will receive all of the products listed below in one of the five new in-colours each month for five months, May through September.
At the end of the 5 months you will receive a 1/2 pack of the In Color 6×6 DSP and the Stampin’ Write Markers free!
By signing up, you are committing to participate in all five months.This club requires 5 members and when a club is full, I will open up a new club. I will send you a invoice on May 10 and payment is due by May 17. I will place the order on May 18 and once I received the products, I will prep them and and contact you for pick up or mail them out to you.
The cost of the In Color Club is $60 for pickup or $70 to mail out.
During the months of June through September, you will receive an invoice on the first day of the month.This invoice can be paid by PayPal, credit card, etransfer, or cash. Once paid, I will place the order by the fifth day of the month.
**If there are products that are unavailable, they will be shipped when they are available at no extra cost to you.
Canadian Residents only
For more information you can private message me or email me at marilynpearen@hotmail.com
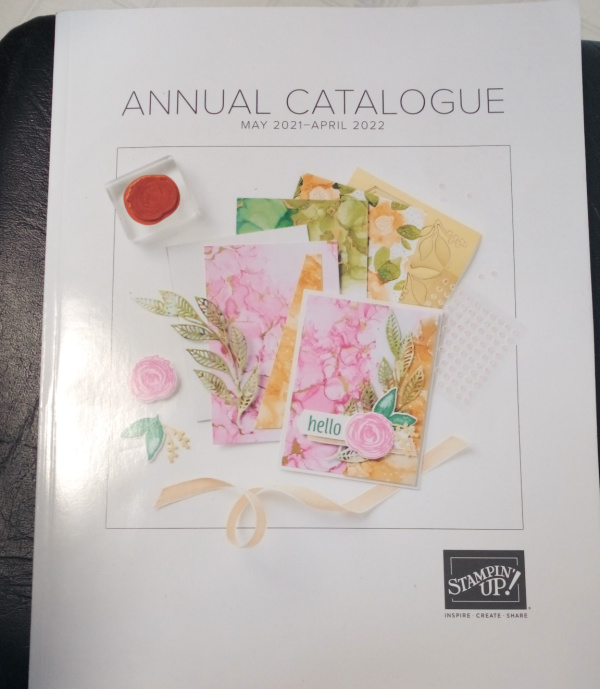
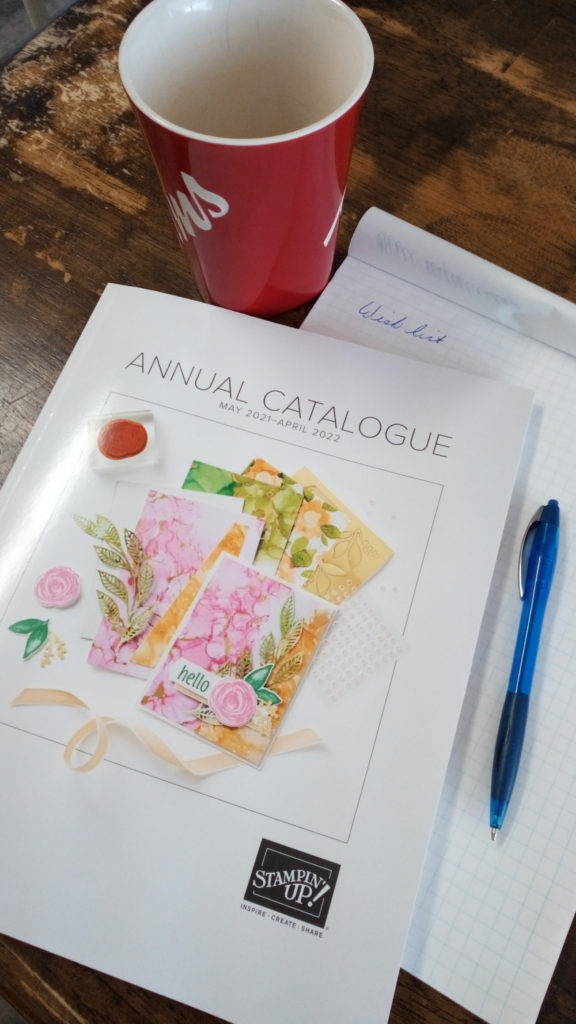
The New 2021-2022 Annual Catalogue will be launching May 4th. There are some great new Designer Series Papers, Ribbons and Embellishments. If you are like me and you would like it all but your budget is limited how about getting a Product Share. What is a Product Share? It’s a great way to get your hands on a sample of the Designers Series Paper, Ribbons and Embellishments.
Individual Shares will include samples of the DSP, Ribbon and Embellishments
Designer Series Paper – 120 sheets, a 6×6 sample of the DSP – cost $56 (includes postage)
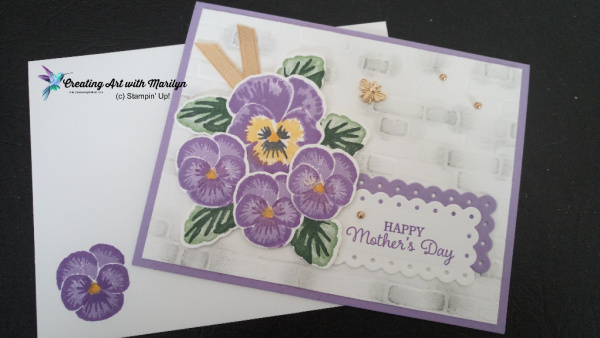
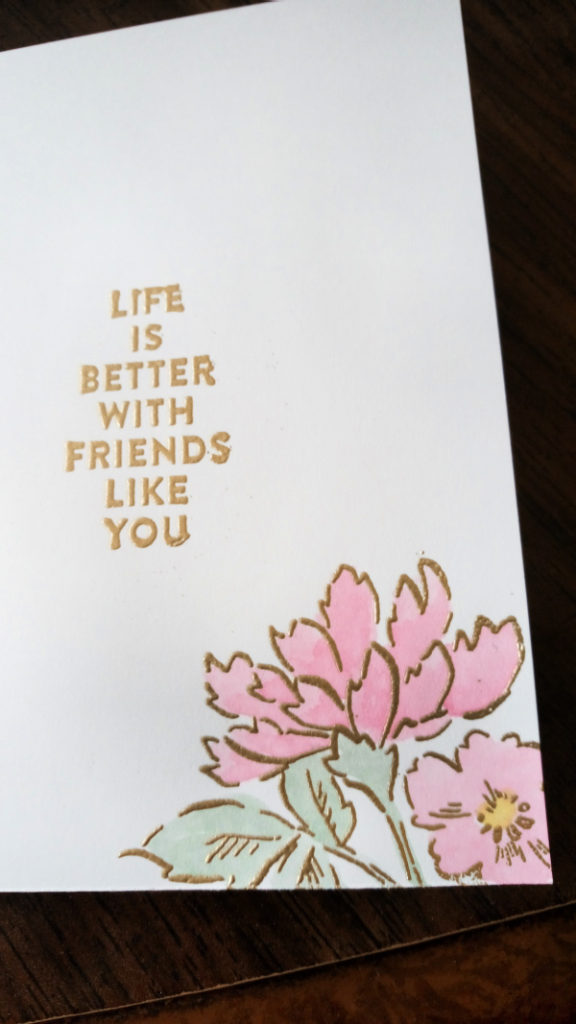
Here is my Mother’s Day card for the Canada Inks Up Blog Hopand the card instructions
Stamps: Pansy Petals, Timeless Tulips
Dies: Pansy Die, Scalloped Contour Dies
Inks: Gorgeous Grape, Highland Heather, So Saffron, Bumblebee, Evening Evergreen, Garden Green, Smokey Slate and Memento Black.
Paper Products: Highland Heather, Basic White card stock.
Other Products: Brick and Mortar Embossing Folder, Gold 1/4″ Ribbon, Bumblebee Trinkets, Metallic Pearls, Wink of Stella, glue dots, dimensionals.
Instructions to make the Card
Card base is Highland Heather 8-1/2 x 5-1/2 scored at 4-1/4, using a landscape fold.
Basic White card stock cut at 4 x 5-1/4 and embossed with the Brick and Mortar embossing folder. Lightly sponge some of the bricks with a sponge dauber using Smokey Slate Ink. Attach this layer to the card base with Stampin Seal.
To stamp the large pansy, I stamped the large detailed pansy first using Gorgeous Grape (I found it easier to see the different layers doing the detailed stamp first) then stamped the background stamp in Highland Heather. The face of the pansy I stamped in So Saffron then the next layer in Memento Black and the center is stamped in Bumblebee.
To stamp the small pansy I stamped the detailed layer first in Gorgeous Grape and the background in Highland Heather. The face of the pansy is in Gorgeous Grape and center is Bumblebee.
The leaves I also found it easier to stamp the darker layer first using Evening Evergreen and then the background in Garden Green.
Die cut the pansies and leaves out using the Pansy Dies.
I assembled the pansies and leaves to the card using dimensionals.
The sentiment is from the Timeless Tulip stamp set stamped in Gorgeous Grape and then die cut using the new Scalloped Contours Dies. I also die cut out a Highland Heather layer using the same die and then glued them together and attached to the card using Stampin Seal.
Fold and tuck a small piece of the Gold 1/4″ ribbon under the pansy cluster using glue dots.
For a little bling I used the Metallic Gold Pearls and the cute Bumblebee Trinket attaching it with glue dots.
I brushed a little Wink of Stella on the pansy faces.
Posted inUncategorized|Comments Off on Instructions for Pansy Mother’s Day Card
I’m so excited to have the opportunity to be in the second Canada Inks Up Blog Hop. For this Blog Hop we were asked to make a project or card using the upcoming products from the New 2021-2022 Annual Catalogue. I choice to use the Pansy Patch stamp set. If you would like to see what products I used to make this card and the instructions click on read more.
Hooray my new Catalogue has arrived! Now it’s time for a coffee and make my Wish list . If you would like your copy of the New 2021-2022 Annual Catalogue please private message me or email me at marilynpearen@hotmail.com
Stampin’ Up has just released the retirement list from the 2020-2021 Annual Catalogue. There are some great deals , some as much as 75% off. Be sure to check out the sale. At these great deals things will be going fast. Be sure to use my April Host Code as well and I will send you a free gift. If your order is over $150.00 Do not use my Host Code as Stampin Up will issue their own rewards.
This was such a cute card to make. I used the In Blooms dies and the Build a Wreath die.
Stamp Set and Dies: Happy Thoughts stamp set, Pierced Blooms Die, Build a Wreath die.
Paper:Purple Posy, Highland Heather, Cinnamon Cider, Blushing Bride, Old Olive, Pear Pizzazz, Mint Macaron, So Saffron, Basic White Card Stock, Natural Touch Specialty Paper and In Good Taste DSP.
Accessories: Stampin’ Cut and Emboss Machine, Basic Rhinestones, Snail Mail Twine, Resin Hearts and Memento Black Ink.
Cutting Instructions:
Basic White card base 8-1/2 x 4-1/4 scored at 5-1/2
Cinnamon Cider 4 x 5-3/8
Natural Touch Specialty Paper 3-3/4 x 5-1/4
Purple Posy for sentiment 7/8 x 3-3/4
Old Olive 4 x 4
Scrapes of Purple Posie, Highland Heather, Pear Pizzazz, Mint Macaron, and So Saffron for flowers and leaves
Instructions:
Fold Basic White card base on score line.
Layer Cinnamon Cider onto card base with Stampin Seal.
Cut out the wreath from the Build a Wreath die in Old Olive and attach it to the Natural Touch Specialty Paper with mini dimensionals.
Cut out a variety of flowers and leaves in Purple Posy, Highland Heather, Pear Pizzazz, and Mint Macaron using the Pierced Bloom die.
Attach the flowers to the wreath with dimensionals and then glue the leaves in place on the flowers using liquid glue.
Put a Basic Rhinestone on each of the small flowers.
Make a bow using 3 strands of the white twine from Snail Mail Twine. Attach it in place with Glue dots.
Stamp the sentiment in Memento Black and attach it to your card with Stampin Seal.
Put 3 of the White Resin Hearts to the sentiment layer.
For cutting and instructions for the pink card continue reading.
Hi my name is Marilyn Pearen and I live in Prince George, British Columbia Canada. I have been a Stampin’ Up Demonstrator for 9 years now. Gosh how time flies when you are having fun and enjoying what you do. I decided to become a demonstrator to share my passion and love for card making.
All contents (including text, photographs and images are sole responsibility of Marilyn Pearen as I am an Indepentent Stampin Up! Demonstrator. The use of any contents, services, classes or products offered on this blog are not endorsed by Stampin Up! It is shared for personal use only. No contents may be removed , duplicated or copied for distribution or advertisement without permission.https://festivefridaychallenge.com/


")


 Designer Series Paper")