

The Canada Inks Up Team Blog Hop challenge was to use products from the Annual and January to June Mini catalogues.
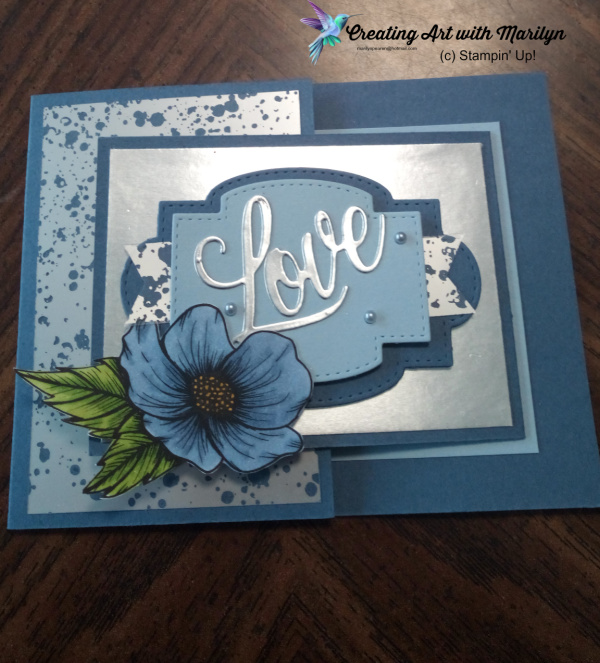
I decided to do a Joy Fold Card and to start with the Forever and Always bundle and see where it went from there. I am quite pleased with the way it turned out.
Here are the instructions for the card.
- Card base Misty Moonlight card stock cut at 8 1/2 x 4 1/4 scored at 5 1/2.
- Sea Side Spray card stock cut at 4 1/4 x 3 1/4 and attached it to middle of the inside of card with liquid glue.
- Inside was a piece of Misty Moonlight card stock cut at 8 x 3 scored at 4″, glued to the top of the Sea Side Spray layer.
- Basic White that was 3 3/4 x 2 3/4 for the area to write on.
- Hydrangea Hill Mercury Glass Acetate cut at 2 3/4 x 4, but I used the flip side of the acetate showing the silver side. I sponged some liquid glue on the wrong side, by doing the sponging of the glue it spread a thin layer of glue all over the acetate therefore the glue did not show through the acetate. I then attached the acetate to the short side on the outside of the card base.
- Silver Foil 2 3/4 x 3 3/4 and attached it the Misty Moonlight flip fold of the card with liquid glue.
- Building the focal point I started with the largest die from the Stitched So Sweetly dies in Midnight Madness and then die cut the next sized die in Sea Side Spray.
- The Mercury Glass Acetate is cut about 3/4 x 3 1/4 and flagged on both ends and glued onto the middle of the Midnight Madness Stitched So Sweetly die with Stampin Seal. The Sea Side Spray die is attached over the top of the Misty Moonlight with dimensionals and then it is all attached to the silver layer with dimensionals.
- The word Love is die cut in Silver Foil from the Always Die set and then attached with liquid glue.
- The flower is from the True Love Designer Series paper which I colored with light and dark Misty Moonlight Blenders and light snd dark Granny Apple Green Blends. It was attached with dimensional and liquid glue.
- Metallic Silver Pearls to finish off my card.
Powered by Linky Tools
Click here to enter your link and view this Linky Tools list…
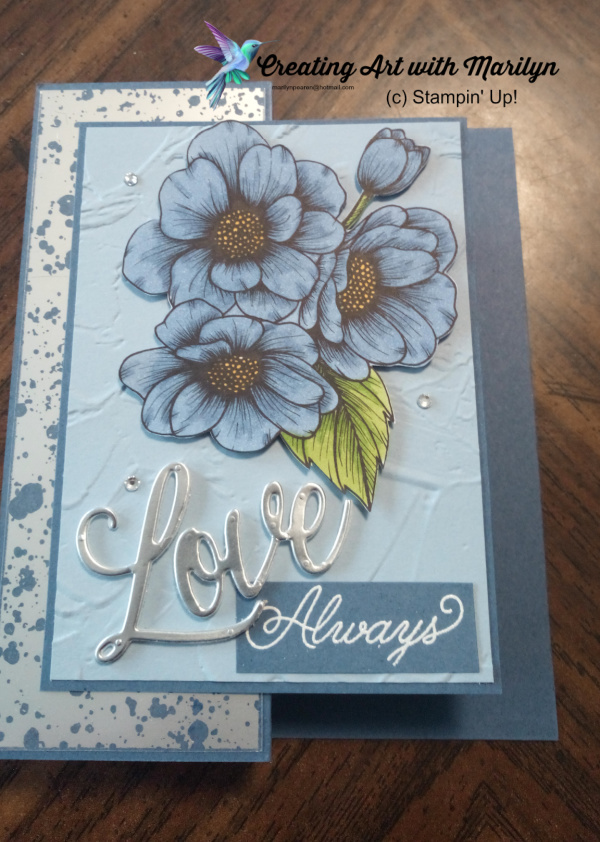
Here are a couple more cards using the same Stampin Up products

If you would like the instructions for my other cards
Stamp Set: Happy Thoughts.
Dies: Hippo and Friends, Layering Circle Dies
Paper: Misty Moonlight card stock, Sea Side Spray card stock, Basic White Card stock, Silver Foil, Hydrangea Hill Mercury Acetate. True Love Designer Series Paper.
Accessories: Light and Dark Misty Moonlight Blends, Light and Dark Granny Apple Green Blends, Dark Daffodil Delight Blend, Misty Moonlight Ink, Painted Texture embossing folder, Hippo and Friends die set, Circle Dies, Metallic Pearls.
Cutting Measurements:
- Misty Moonlight card base 8-1/2 x 4-1/4 scored at 5-1/2
- Sea Side Spray 3 x 4-1/4
- Silver Foil 1/2 x 4-1/4 (2)
- Hydrangea Hill Mercury Acetate 2 x 5
- Misty Moonlight 3 x3
- Basic White 2-1/2 x 2-1/2
- Instructions:
- Fold Misty Moonlight card base on score line.
- Run the Sea Side Spray card stock through the Painted Texture embossing folder.
- Attach the Silver Foil strips to each of the long sides of the Sea Side Spray with adhesive and glue this layer to the card base.
- Using the silver side of the Mercury Acetate, flag one end and then to attach this to your card use a sponge and dip in liquid glue and lightly sponge glue all over the acetate. By applying the glue this way the glue will not show through the acetate.
- Die cut the Misty Moonlight layer out using the Hippo Friends die.
- Cut out a circle using the circle die and stamp the sentiment in Misty Moonlight ink. Attach this layer to your card using dimensionals.
- Color the flowers from the True Love DSP in light and dark Misty Moonlight blends and the leaves in the light and dark Granny Apple Green and the centers of the flowers use dark Daffodil Delight blend. Fussy cut the flowers out. Attach the flowers using liquid glue and dimensionals to pop up the flowers.
- Place the Metallic Pearls around the sentiment for a little bling.

Stamp Set: Always in my Heart.
Dies: Always Die.
Ink: White Embossing powder.
Paper: Misty Moonlight, Sea Side Spray, Hydrangea Hill Mercury Acetate, True Love DSP, Silver Foil.
Accessories: Painted Texture embossing folder, Versamark, White embossing powder, foam adhesive sheets, Misty Moonlight light and dark blends. Granny Apple Green light and dark blends, Daffodil Delight dark blend, Basic Rhinestones.
Cutting Measurements:
- Misty Moonlight card base 8-1/2 x 4-1/4 scored at 2-1/8 and 4-1/4.
- Misty Moonlight layer 3-1/8 x 4-3/4.
- Sea Side Spray 3-1/4 x 4-1/2
- Hydrangea Hill Mercury Acetate 2 x 5-3/8
- Misty Moonlight for sentiment 5/8 x 1-3/4
- Silver Foil 2 x 3
- Foam Adhesive sheet 2 x 3
- Basic White (for the inside) 3 x 4-1/4
Instructions to make card:
- Fold Misty Moonlight card base on scored lines to form a “Z” fold.
- Attach the Mercury Acetate onto the front flap by lightly sponging glue on the colored side as I am using the silver side as my layer.
- Run the Sea Side Spray layer through the Painted Texture embossing folder. Adhere this layer to the Misty Moonlight layer with liquid glue.
- Attach this layer to the acetate layer but only put glue on half of the layer.
- Attach the Silver Foil to the Foam Adhesive Sheet and then die cut out the Love from the Always die set.
- I wanted to use just the word Always from the Always in My Heart stamps set so I taped off the other words and stamped in Versamark and them heat embossed in White powder.
- I colored the flowers in Misty Moonlight light and dark, the leaves in Granny Apple Green, and the flower centers in Daffodil Delight dark.
- I attached the flowers to the card layer using dimensionals.
- I glued the Always sentiment in the right corner with liquid glue and then place the Love on a slight angle.
- For a little bling I placed Basic Rhinestones on the Sea Side Spray layer.
- Center the Basic White layer on the inside of the card making sure none of the white shows through when card is closed.
Product List:
 |  | |||
 |  |  |


Wow Great Cards Marilyn. Thanks for sharing
Beautiful cards Marilyn! Thanks for sharing!
Beautiful cards! Thank you so much for ALL the instructions!!
WOW – these are stunning cards!
Marilyn, Your cards are gorgeous. Love the soft colours that you used for them.
Love your blog. I know you worked hard to get it up and running.
Very pretty cards – love the blues!
Beautiful card. The blue flowers are excellent!