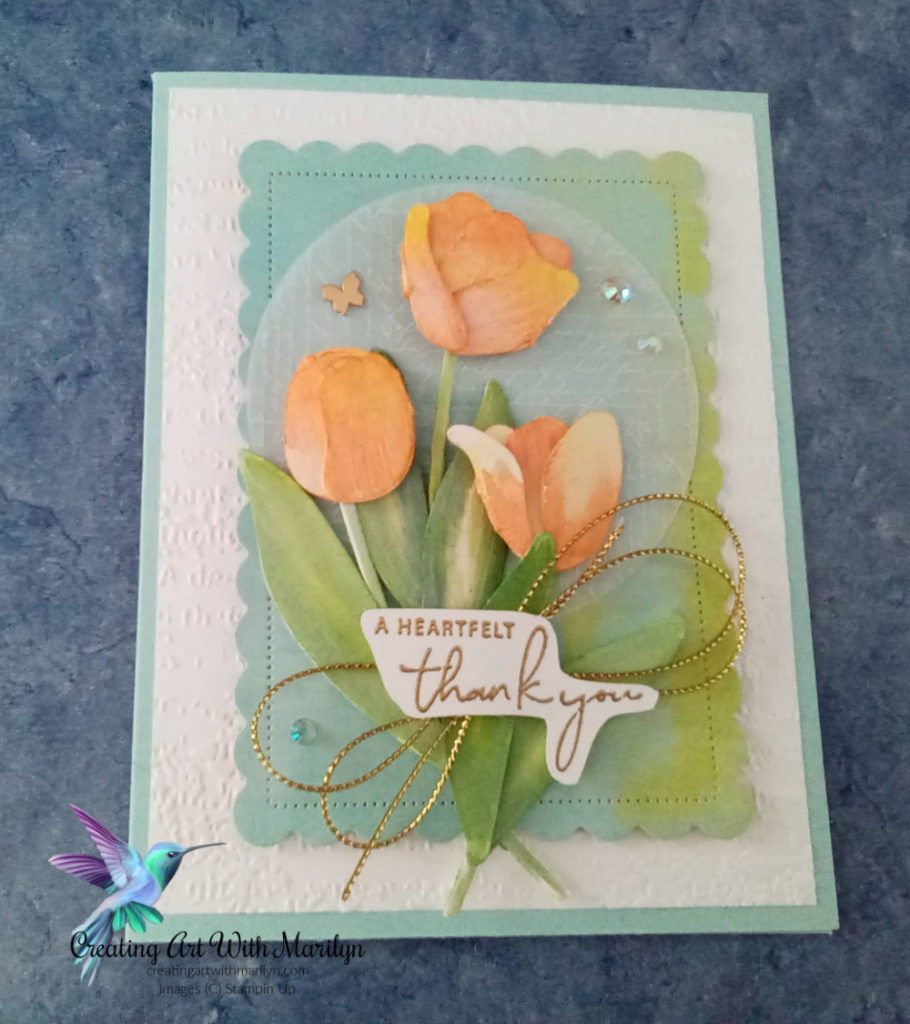
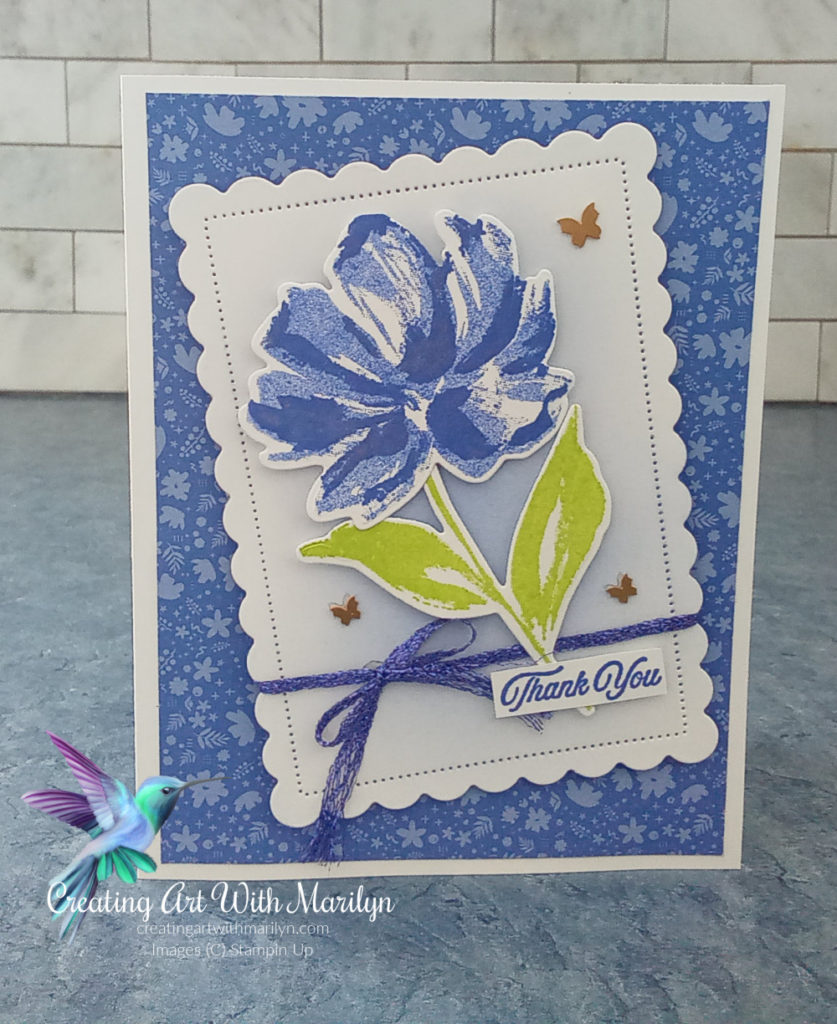
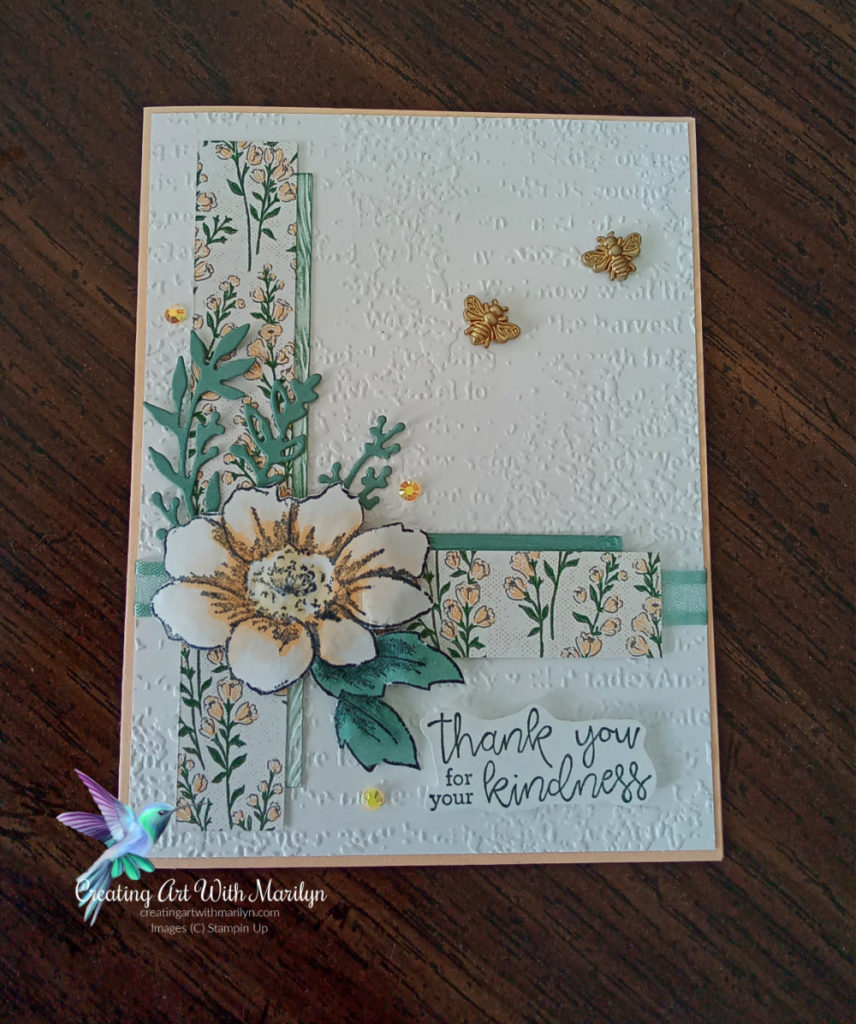
I am so excited to once again be participating in Kylie’s Monthly International Highlights Blog Hop challenge for May. This challenge is a gallery of Demonstrators’ projects from all over the world and then our cards are voted on. The theme of this challenge is ‘Thank You’. I decide to try my hand at water coloring. Tulips are one of my favorite Spring flowers so I decided to try water coloring them.
I love Tulips and I wanted to try water coloring them. I used the Tulip Die Set and the Fluid Water Colored Paper and painted the tulips. I placed the tulips on a layer of vellum and a piece of Designer Series Paper die cut with a Scalloped Contour Die. These were then layered onto a Basic White layer embossed with the Timeworn Type 3D embossing folder. The twine is the gold Simply Elegant Trim. Iridescent Rhinestones and a Brushed Brass Butterfly finish off the card.For details on my card read more
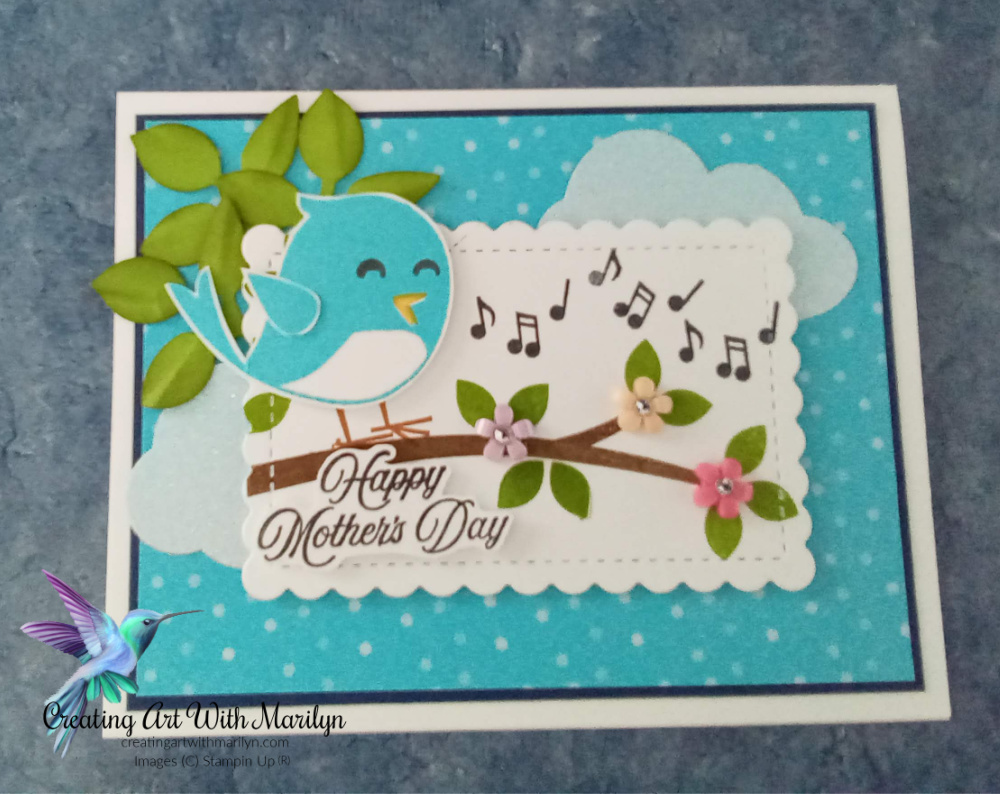
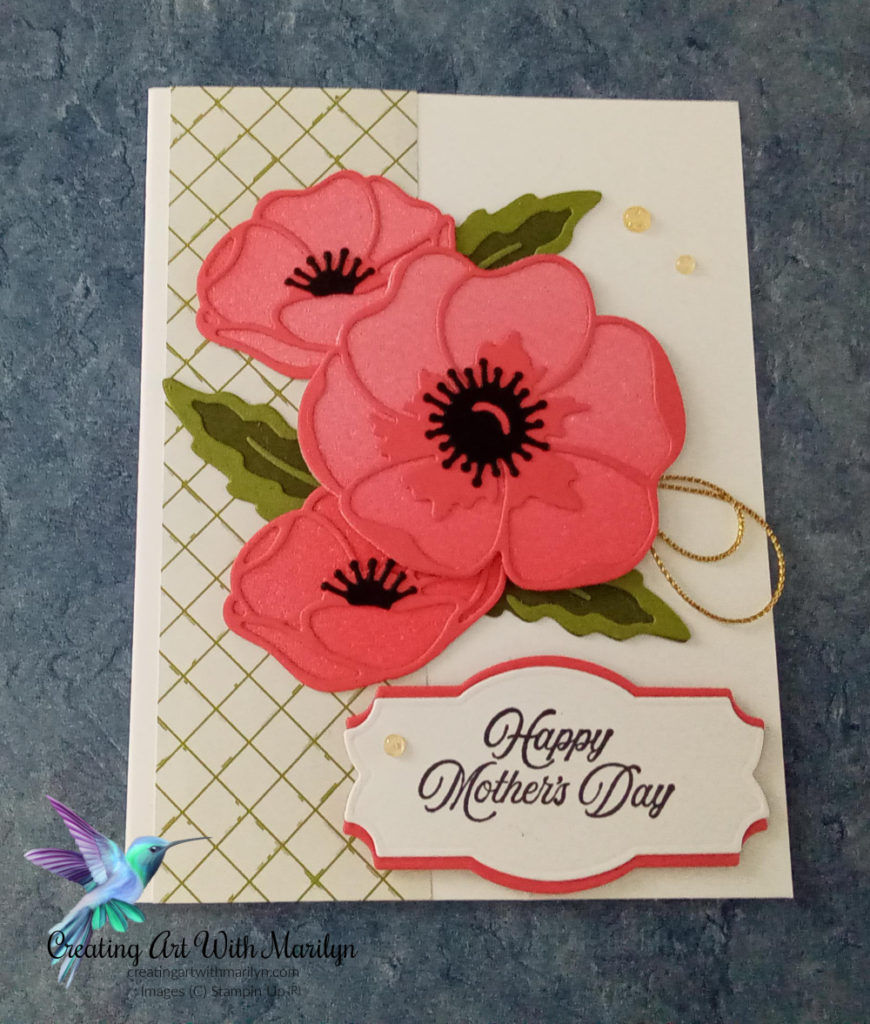
When I saw the Sweet Song Bird Stamp set in the New 2022-2023 Annual Catalogue I just knew I had to have it! I am so excited to play with the New In Colors as well. I wanted to combine them and make a Mother’s Day card.
I love how cute the little song bird is and I wanted to make a Mother’s Day card. I used the Sweet Songbirds Bundle along with the New In Color 6×6 Designer Series Paper in Tahitian Tide and the 2022-2024 In Color Glimmer Variegated Paper in Tahitian Tide as well for the clouds. I used a retired Branch punch for the leaves but the Bough punch would work great. I think the finishing touch to the card was the Loose Flower Flourish gems and the Basic Rhinestones. For the details on the card click here.
Posted inUncategorized|Comments Off on Sweet Songbird-Mother’s Day card
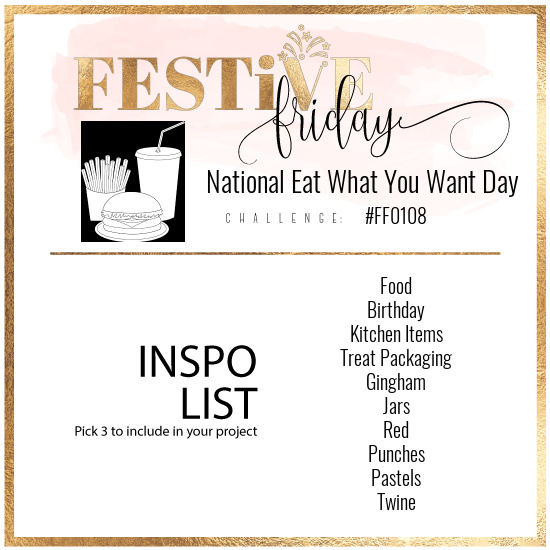
It’s time once again for a Festive Friday Challenge. This Challenge was designed by several talented Demonstrators from all over the World. For the Challenge we are given a list of 10 inspirational items to pick from to create a card, and we must pick at least 3 items from the list.
I am so excited for the New 2022-2024 In Colors, I think one of my favorite color is Sweet Sorbet. I decided to use the Variegated In Color Glimmer paper to create my card. The poppies are from the Poppy Moment Dies. the stamp set is called Painted Poppies (not used this time). The DSP I used is the New Host Designer Series Paper called Design a Daydream. The sentiment was from the Celebrating You Stamp set and punched out with the Natural Print die. To see the details for my card click here.
Woohooo! It’s finally here! The New 2022-2023 Annual Catalogue is available now and you can start ordering from it today! It is amazing and full of great products. If you haven’t received your catalogue, please contact me and I’ll send you one! You can also view the Catalogue Online
Love the catalog as much as I do and want it all?? Purchase the Starter Kit for $139 CAD+ tax (and it ships for free!!) between May 3-31 and you’ll get to pick $165 of Stampin’ Up! products of your choice and you’ll get $91.25 in 2022-2024 In Color products for FREE with your kit! Once you join, you’ll get at least a 20% discount on everything that you order as a Demonstrator and there is no requirement to sell or host events. You can simply purchase the Starter Kit and get the discount for yourself! Click on the image and it will take you directly to my Online Store
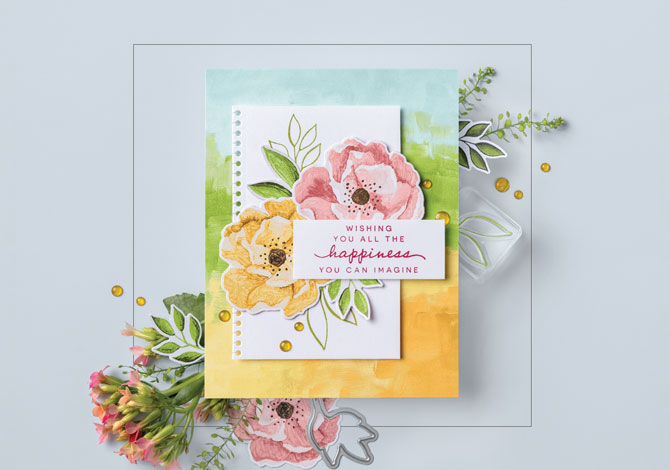
I have created a few cards from the catalogue
You can get the details to make these cards by clicking on the cards
Posted inUncategorized|Comments Off on New 2022-2023 Annual Catalogue
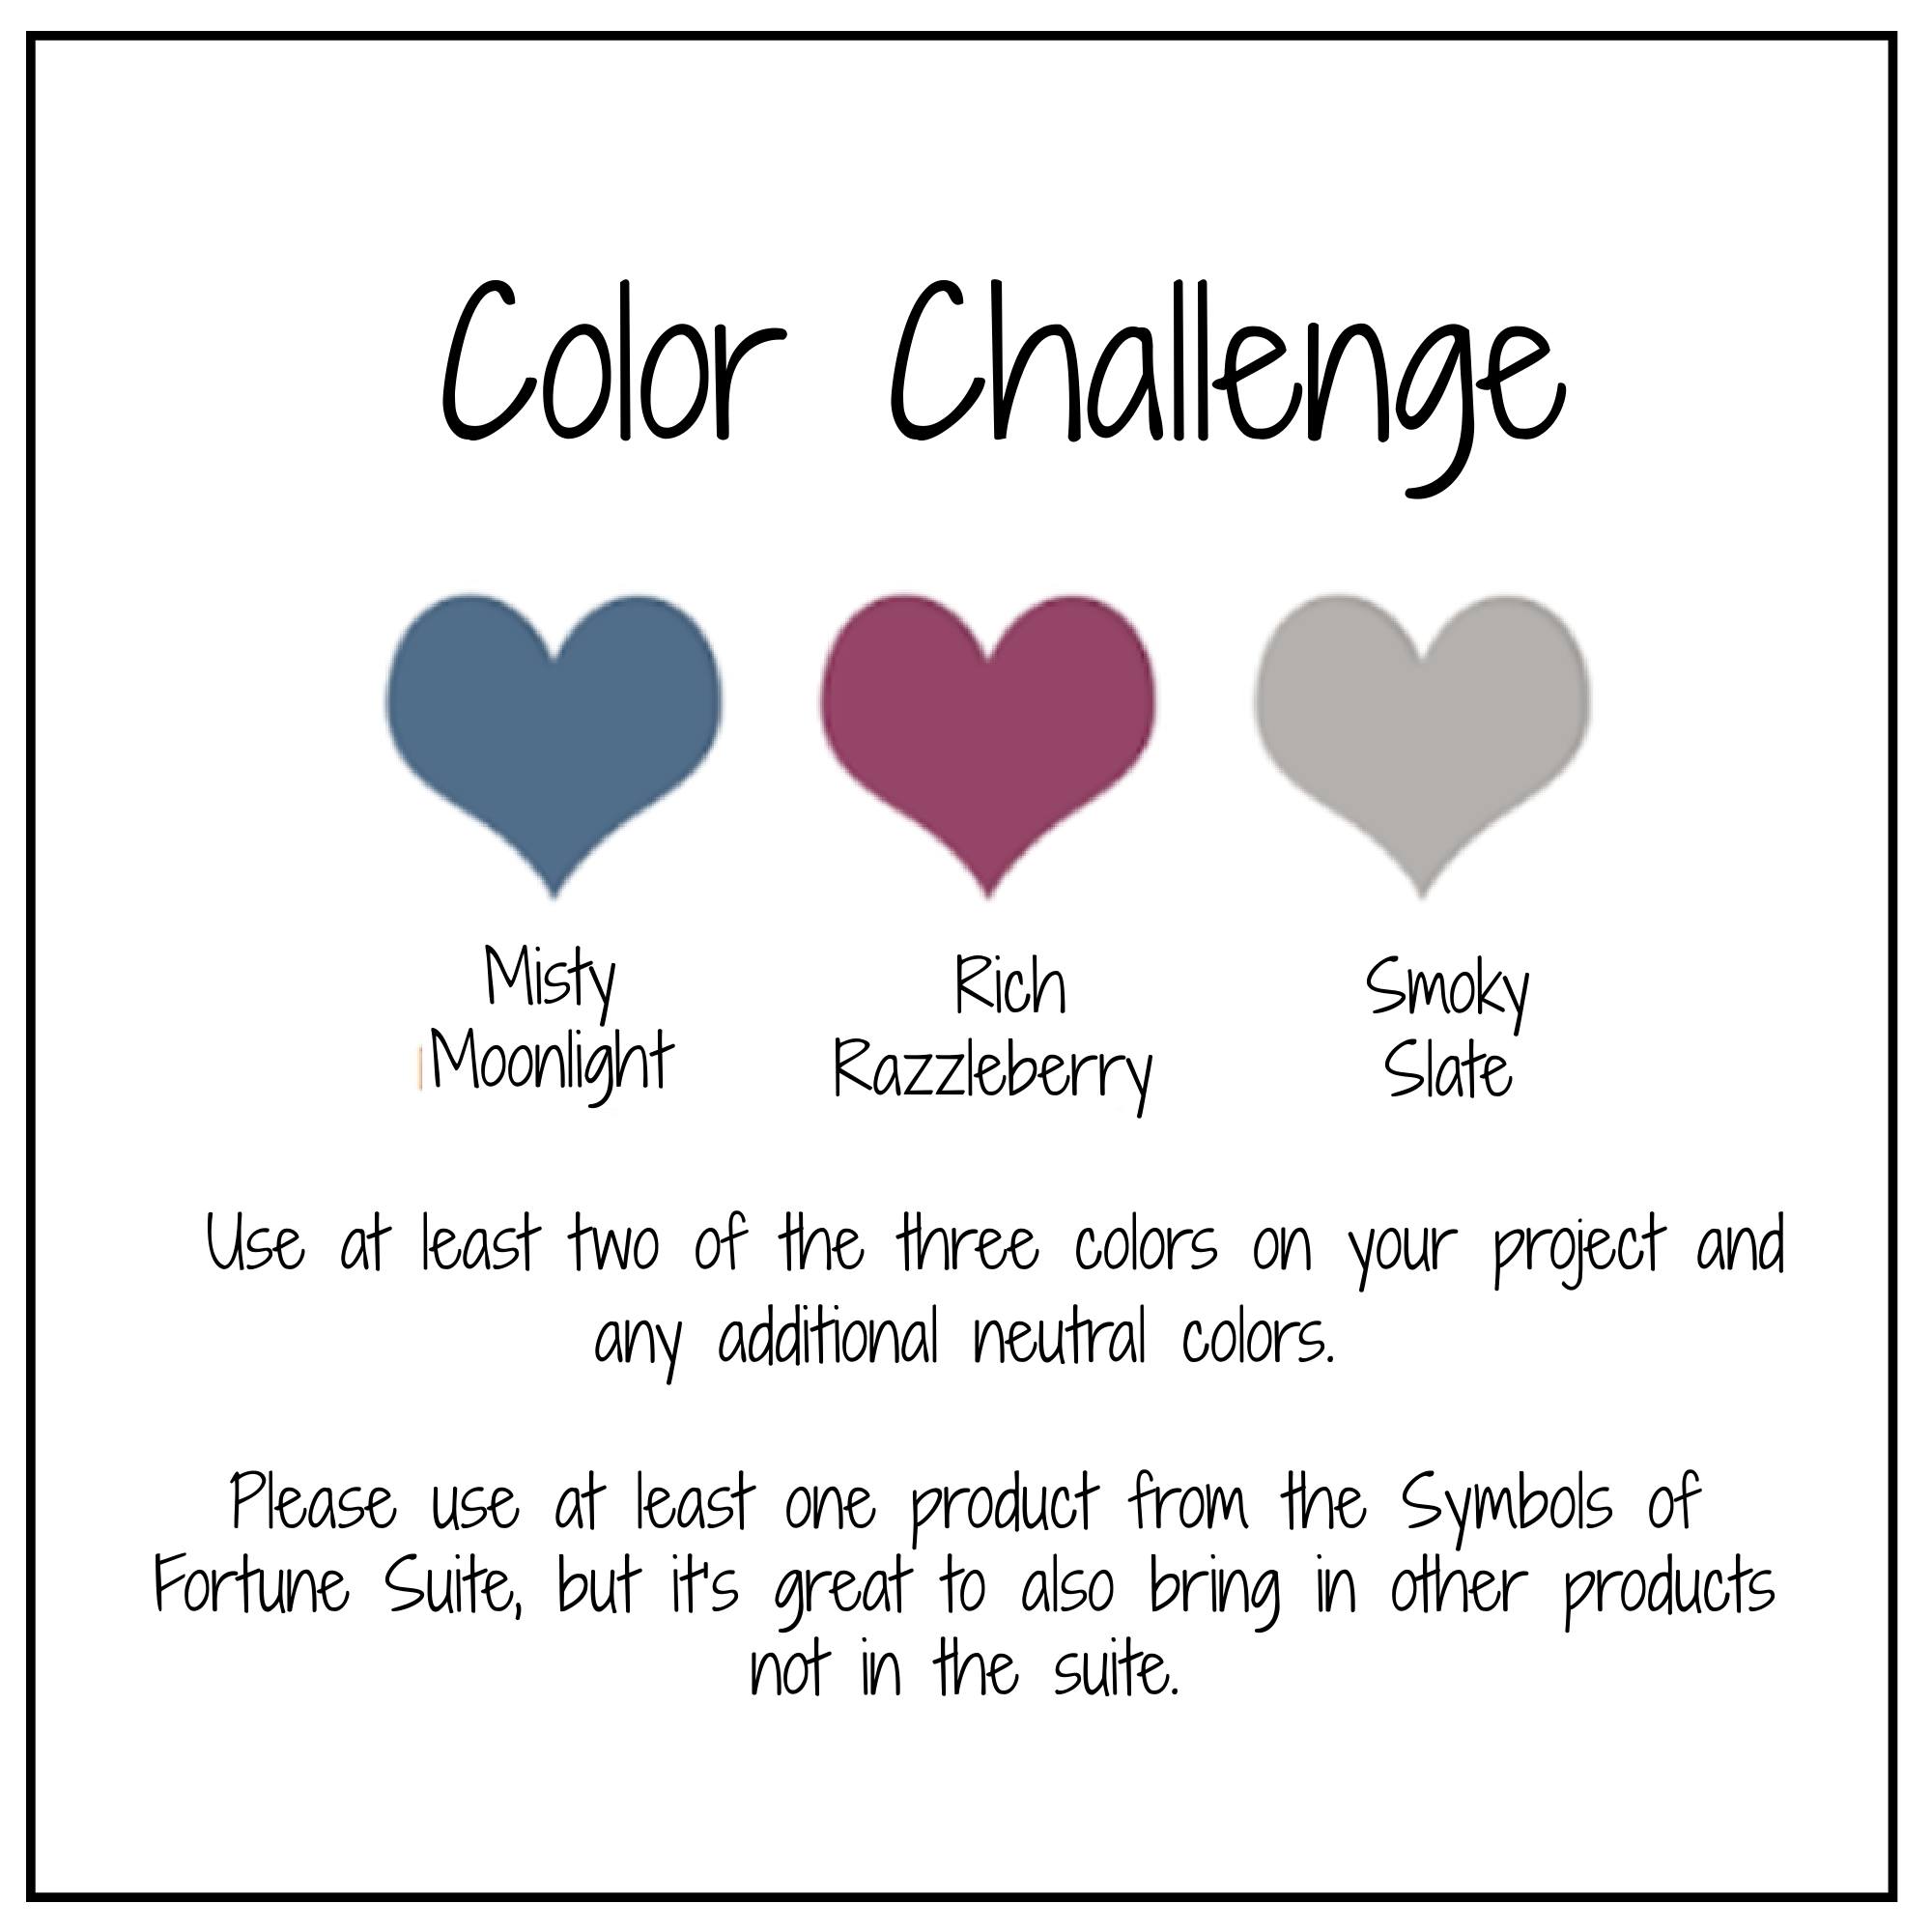
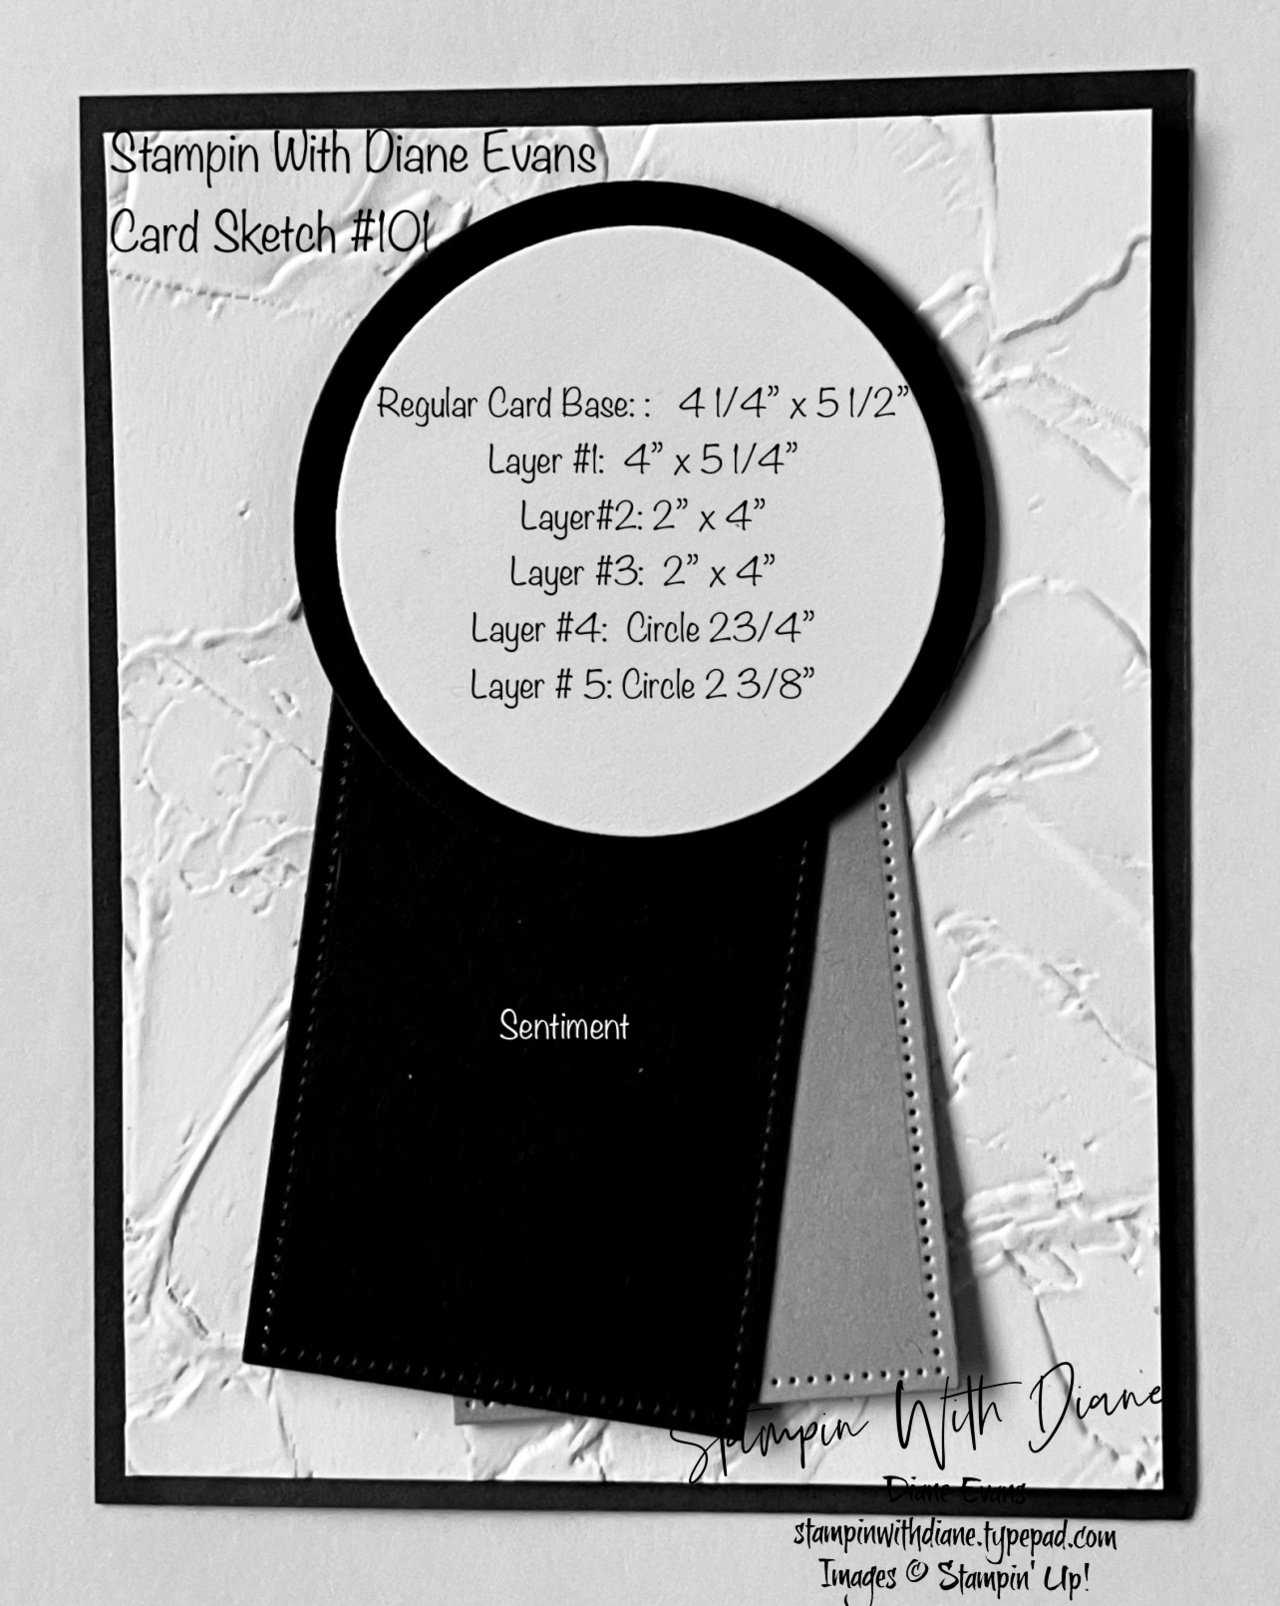
I had to do a Color Challenge for a Stamp Camp I was in, I love the colors but wasn’t quite sure about putting them together. The colors were Misty Moonlight, Rich Razzleberry, and Smoky Slate. I decide to use a card sketch to help me design my card.
The card base is Smoky Slate, the layer is Basic White which has been embossed with the Painted Texture 3D embossing folder. The Misty Moonlight and the Rich Razzleberry tags were made with the Tailored Tag dies. The circles were from the Layering Circle dies in Basic White and Misty Moonlight cardstock. The roses were stamped and cut from the New Happiness Abound Bundle,. They were colored with the Blender Pens. For the roses, I used Light and Dark Seaside Spray (which have retired) and the Light Misty Moonlight, the leaves were colored with Light and Dark Granny Apple Green. If you would like to see the instructions ….
Posted inUncategorized|Comments Off on Color Challenge-Card Sketch-Hue of Happiness
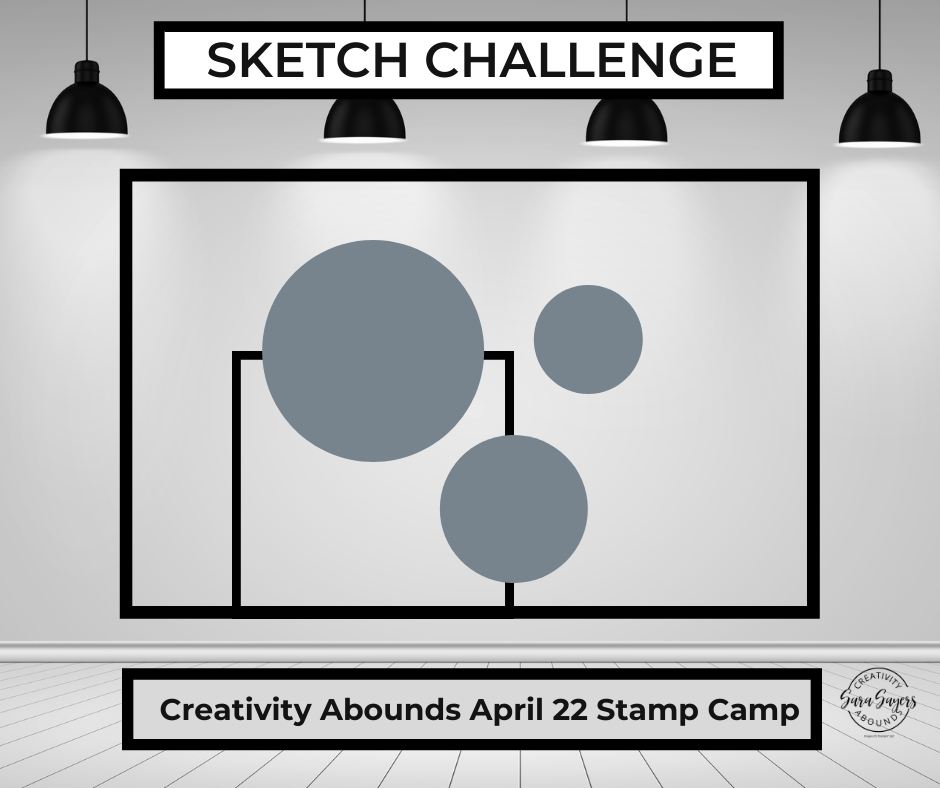
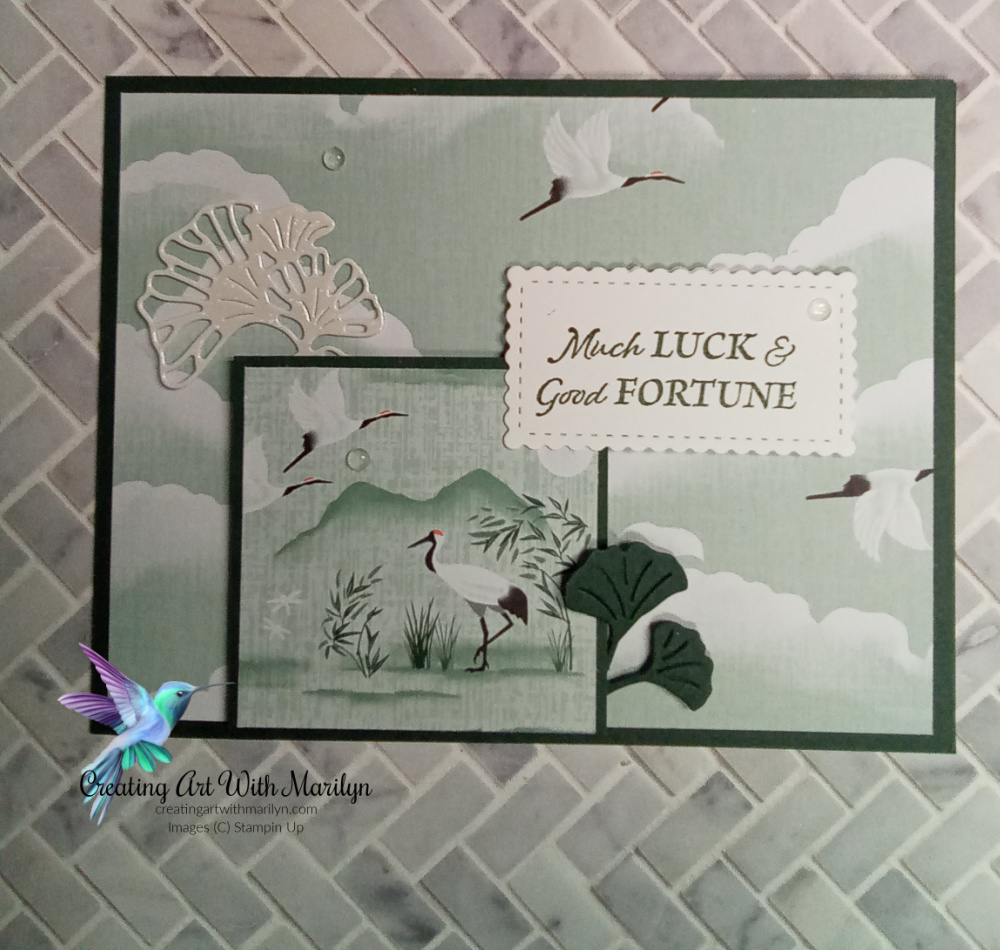
I recently participated in a Symbols of Fortune Creativity Abounds Stamp Camp and one of the challenges was a card sketch using the Symbol of Fortune Suite.
Here is the card sketch that Sara Sayers gave us. This is my card I created using the card sketch and the Symbols of Fortune Suite.
I love the Symbols of Fortune Designer Series Paper and the one with the cranes is really pretty. If you would like to see what products I used and the instructions read more
Posted inUncategorized|Comments Off on Symbols of Fortune-Card Sketch
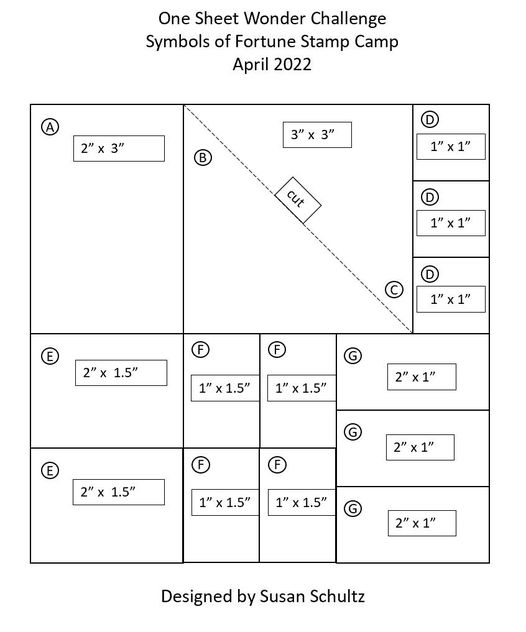
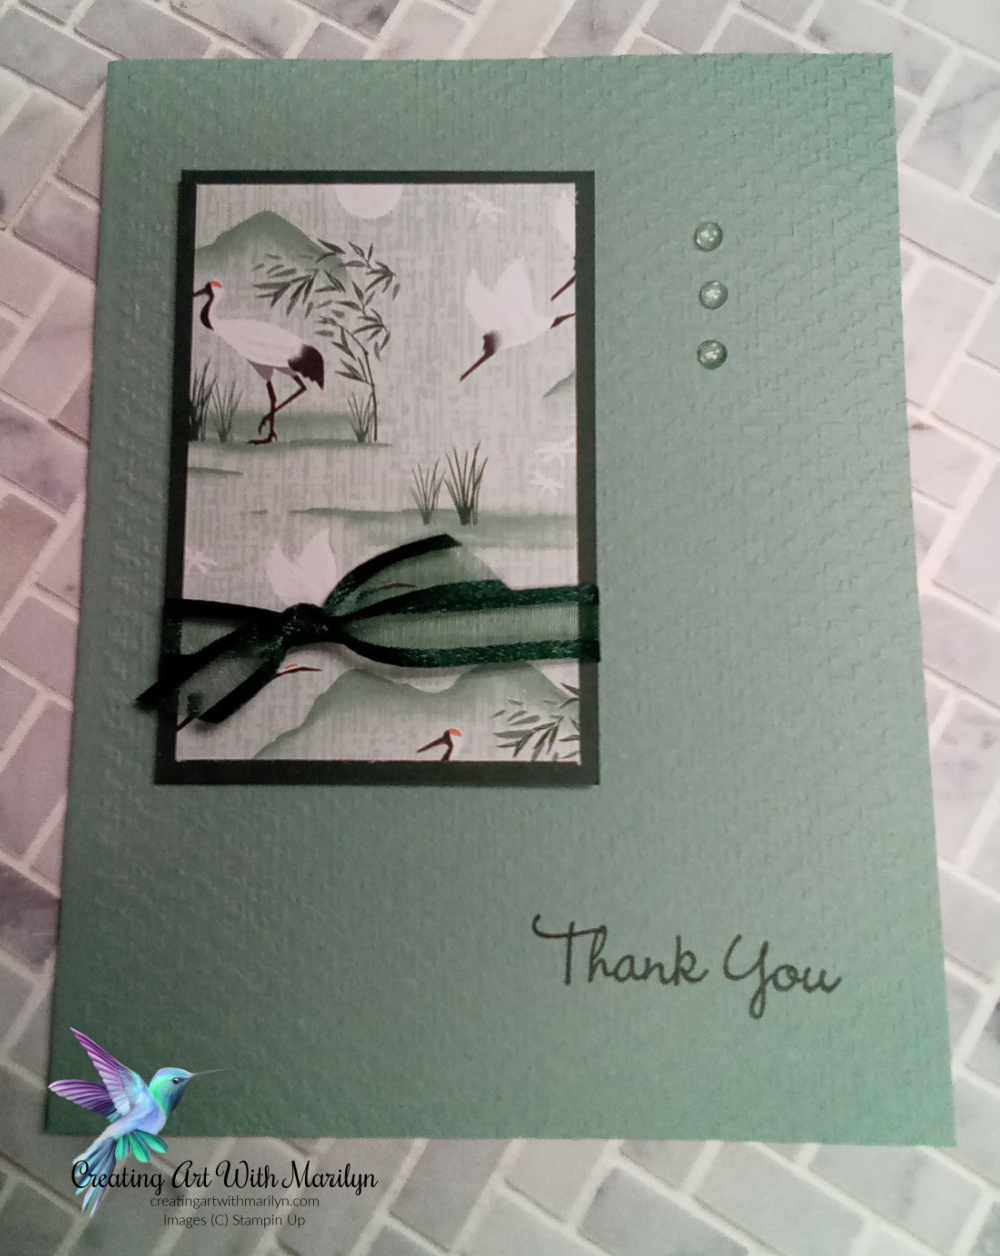
Have you ever tried making a 6×6 One Sheet Wonder? What is a A One Sheet Wonder you ask, it is when you cut a piece of Designer Series Paper into a number of smaller pieces and then create several different cards using a group of the pieces. I participated in a Symbols of Fortune One Sheet Wonder Challenge in the Creativity Abound Stamp Camp that several very talented demonstrators from all over the world created. Here is the layout for the One Sheet Wonder that Susan Schultz created and the cards I made for the challenge.
If you would like to see the instructions for each card click on the card and it will take you to instructions. The card with the two triangles I used both triangles but you can easily make it into 2 different card.
Posted inUncategorized|Comments Off on Creativity Abound-Symbols of Fortune-6×6 One Sheet Wonder Challenge
I’m happy to be able to participate in the April 2022 Canada Inks Up Blog Hop once again.
We are a group of Canadian Demonstrators, that love sharing our ideas in hope to inspire you. This month’s theme is a Sneak Peek – 2022-2023 Annual Catalog . I love the New In Colors for 2022- 2024 and I decided to use Orchid Oasis and the Art Gallery Stamp set.
Here are the cutting layout and the instructions to create my card:
Card base is Basic White card stock 8 1/2″ x 5 1/2″ scored and folded at 4 1/4″
Layer 1 is the New 6 x 6 In Color Orchid Oasis Designer Series Paper (159253) cut at 4″ x 5 1/4″ adhered to card base with liquid glue
Die cut a piece of Basic White card stock with the Scalloped Contour Dies
Lightly brush the scalloped die with the Orchid Oasis ink (159214)
Wrap and tie a bow around the scalloped die piece with the new In Color Orchid Oasis Metallic Woven Ribbon (159199)
Stamp the Art Gallery image in the Orchid Oasis Ink (159214), stamping off for the first layer and then full strength for the layering image. Stamp the leaves in Parakeet Party (159210)
Die cut out the images with the Floral Gallery Dies
Adhere the flower image to the scalloped die with dimensionals
Stamp on a scrap piece of Basic White card stock a sentiment from the new Celebrating You stamp set(158028) in Orchid Oasis and attach with dimensionals
Attach the focal image to the card on a slight angle with dimensionals
Place some Brushed Brass Butterflies on the card
Now that you have seen my card grab a beverage and check out the other Demonstrators and the lovely creations.
I am so pleased to once again be able to participate in Kylie’s International Winners Blog Hop. Thank you everyone so much for voting for my card. This is the card I entered in the Blog Hop that everyone voted for. To see how it was created here are the cutting andinstructions for it.
My card that I’m entering in the Winner’s Blog Hop is made with the New 2022-2023 Suite called the Sun Print Suite. This suite features beautiful Designer Series Paper and the Nature’s Print Bundle. I am so excited to use the New In Colors as well.
Here are the cutting and instructions to make my card:
Card base is Starry Sky card stock cut at 8 1/2″ x 5 1/2″, scored and folded at 4 1/4″.
Basic White layer is 4″ x 5 1/4″ which has been embossed with the New Fern 3D embossing folder. Attach the embossed layer to card base with liquid glue.
Cut a strip of the Starry Sky card stock at 1 3/8″ x 5 1/4″.
Cut a piece of the Sun Print Designer Series Paper 1 1/4″ x 5 1/4″ and attach it to the Starry Sky Card stock with liquid adhesive, then attach this layer to the card with liquid glue.
Die cut a Basic White tag using the Tailored Tag Dies and stamp an image from the Nature’s Print stamp set in Starry Sky ink.
On the back side of the Layering Designer Vellum that is 2″ x 4 1/2″ lightly brush with Night of Navy ink.
Die cut 2 Circles using the Layering Circle dies.
Die cut a smaller circle in Starry Sky card stock and heat emboss a sentiment in White Embossing Powder.
Cut a piece of the Metallic Mesh Ribbon about 4″ and then cut it in half the long ways to make a narrower strip.
Thread the ribbon through the hole in the tag.
Attach the tag with dimensionals on a slight angle to the card.
Slip the 2 circles under the tag and attach them with a couple of Glue Dots.
Place the Sentiment on the tag with some dimensionals.
Add 3 Basic Rhinestones to the card for some bling.
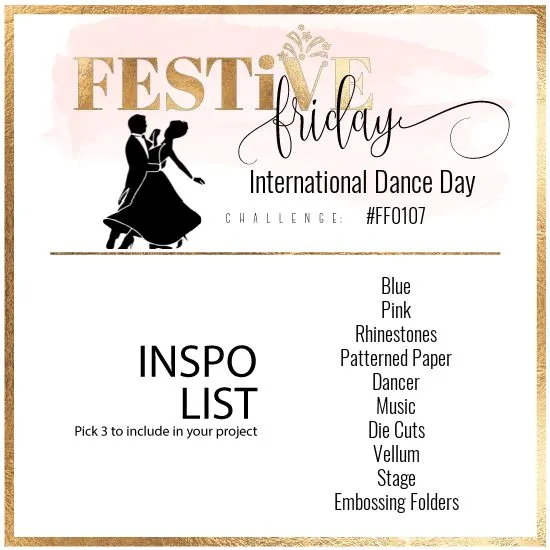
It’s time for another Festive Friday Challenge. This challenge is created by several very Talented Demonstrators from all over the world. This weeks challenge is International Dance Day #FF0107. The challenge is to pick at least 3 items from the Inspiration list and create a card.
For my card I picked Pink, Patterned Paper, Die Cuts, Vellum and Rhinestones.
Here are the cutting and instructions to make my card:
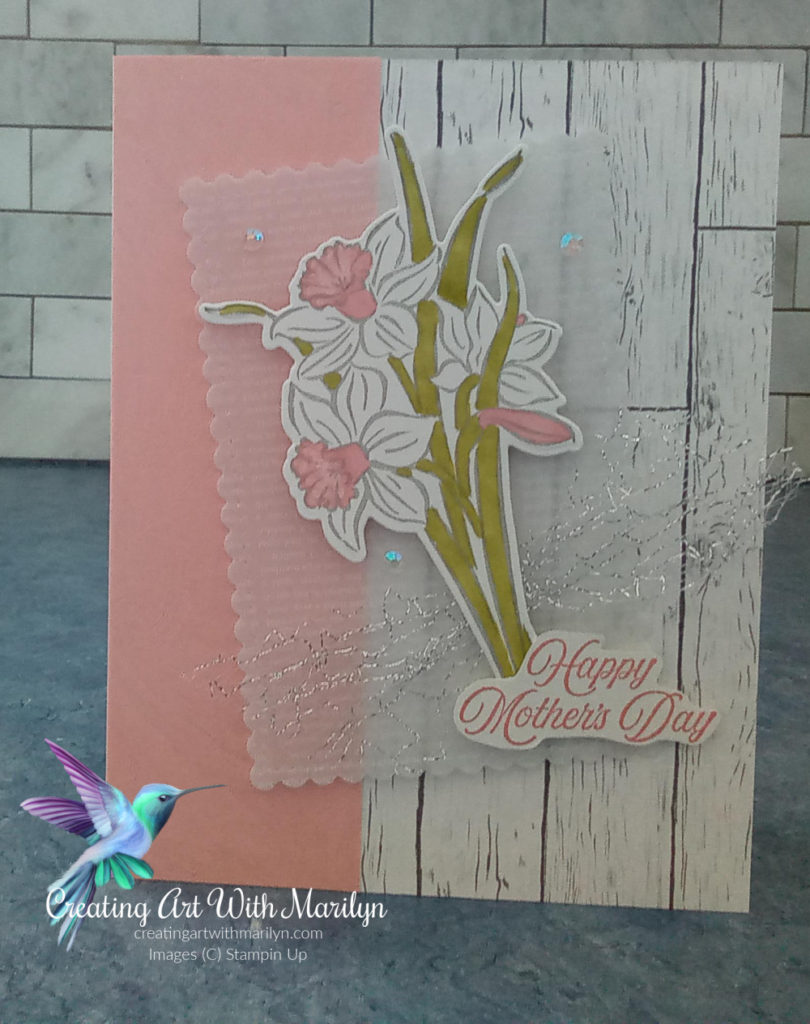
Card base is Basic White cut at 8 1/2″ x 5 1/2″ scored and folded at 4 1/4″
Cut a piece of designer Series Paper 2 5/8″ x 5 1/2″ from the Heart and Home DSP, attach it to the card base matching the edges of the card base evenly
Cut a piece 1 3/4″ x 5 1/2″ of the New Brushstroke 12 x 12 Specialty Paper (159250) in Blushing Bride, over lap the Designer Series Paper slightly and match the edge of the card base
Die cut a piece of the Layering Design Vellum using the Stitched Rectangle Dies
Stamp an image on Basic White from the Daffodil Daydream stamp set in Smokey Slate then die cut the image using the Daffodil Dies
Color the image with Stampin Blends in Light Flirty Flamingo, and the Color Lifter to soften the pink, and Light and Dark Old Olive for the leaves and stems
Attach the daffodils to the vellum with dimensionals
Attach the vellum to the card with dimensionals placing them where the image is on the vellum so they don’t show
Cut about 4″ of the Metallic Mesh ribbon and pinch it in half with a glue dot and place it under the daffodil stems
Stamp a sentiment from the Celebrating You stamp set in Blushing Bride and fussy cut it and attach it with dimensionals
Hi my name is Marilyn Pearen and I live in Prince George, British Columbia Canada. I have been a Stampin’ Up Demonstrator for 7 years now. Gosh how time flies when you are having fun and enjoying what you do. I decided to become a demonstrator to share my passion and love for card making.
All contents (including text, photographs and images are sole responsibility of Marilyn Pearen as I am an Indepentent Stampin Up! Demonstrator. The use of any contents, services, classes or products offered on this blog are not endorsed by Stampin Up! It is shared for personal use only. No contents may be removed , duplicated or copied for distribution or advertisement without permission.https://festivefridaychallenge.com/


")


")


 Designer Series Paper")
 Layering Designs")