Hello Crafters, It’s time for another Monochromatic Insta Hop. This hop is where we make cards using only one color. This is not a technique I use very often but great cards can be created with only one color and some card stock and designer series paper! For this weeks Monochromatic Color is Pumpkin Pie. I decided to use the Two Tone Floral stamp set and dies (soon to be retiring) and did the stamping off effect to give the flowers a two tone look. The leaves and dots are stamped directly on the Basic White card stock. The sentimental flag is the largest tag die from the Stylish Shaped dies and cut smaller then sponged with a sponge dauber. The sentiment is from Layering Leaves. Instructions here
Posted inUncategorized|Comments Off on Insta Hop – Monochromatic – Pumpkin Pie
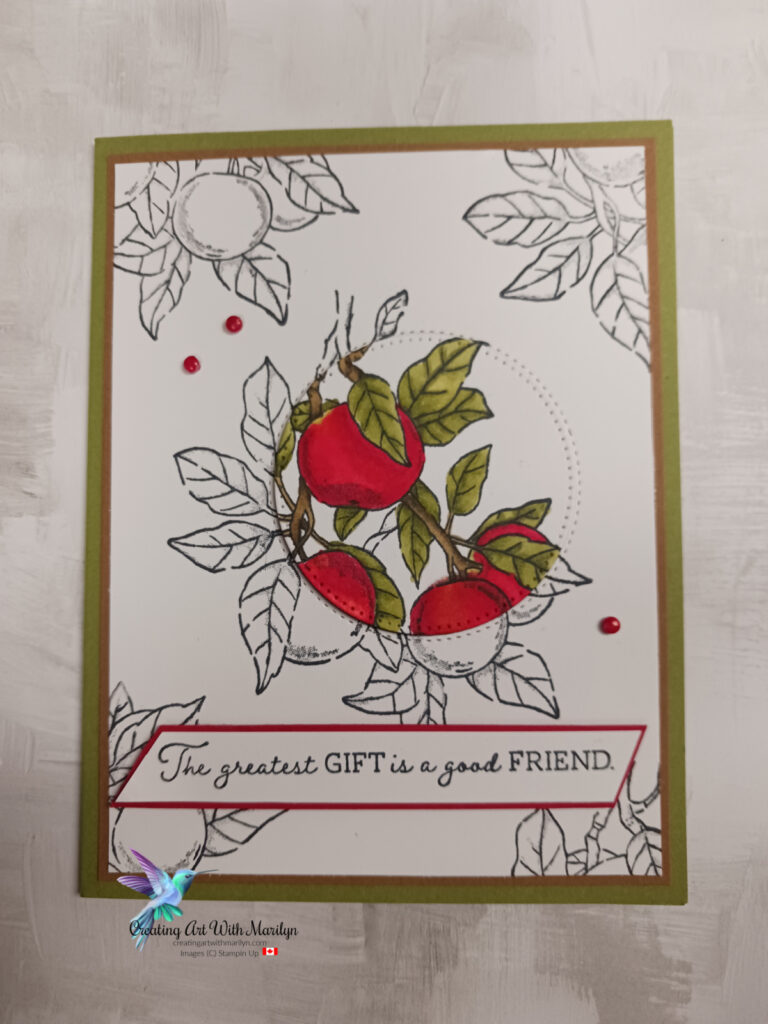
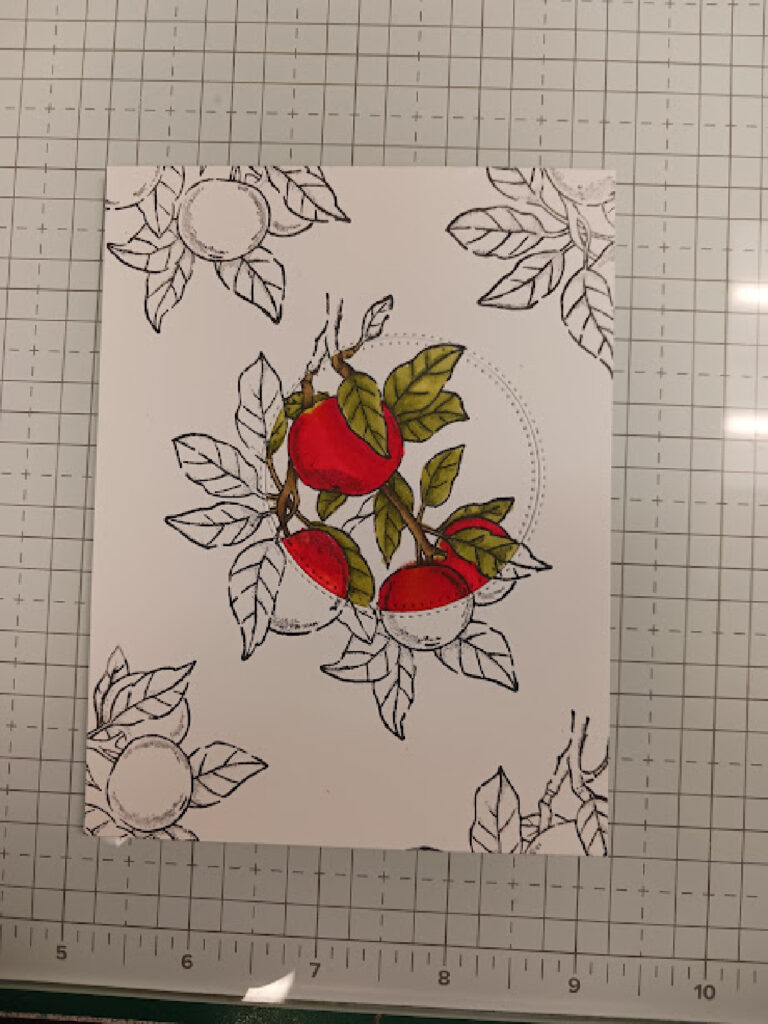
It’s time for another Technique Tuesday Blog Hop. I am so happy to be able to participate in this month’s Blog Hop. This month’s theme is Spotlighting. This technique is when you cut out a portion of your stamped card layer with either a die or a punch and color only the portion that has been removed from the card layer and then pop it back onto the card with dimensionals.
I used the Apple Harvest stamp set and punched it out with the Stylish Shape Circle dies. The image is colored with Stampin Blends. Here is my finished card.
Cutting and Instructions:
Card base is Old Olive card stock, cut at 8 1/2″ x 5 1/2″ , scored and folded at 4 1/4″
Cut Pecan Pie card stock 4″ x 5 1/4″, adhere directly to the card base with liquid glue
Cut Basic White card stock 3 7/8″ x 5 1/8″
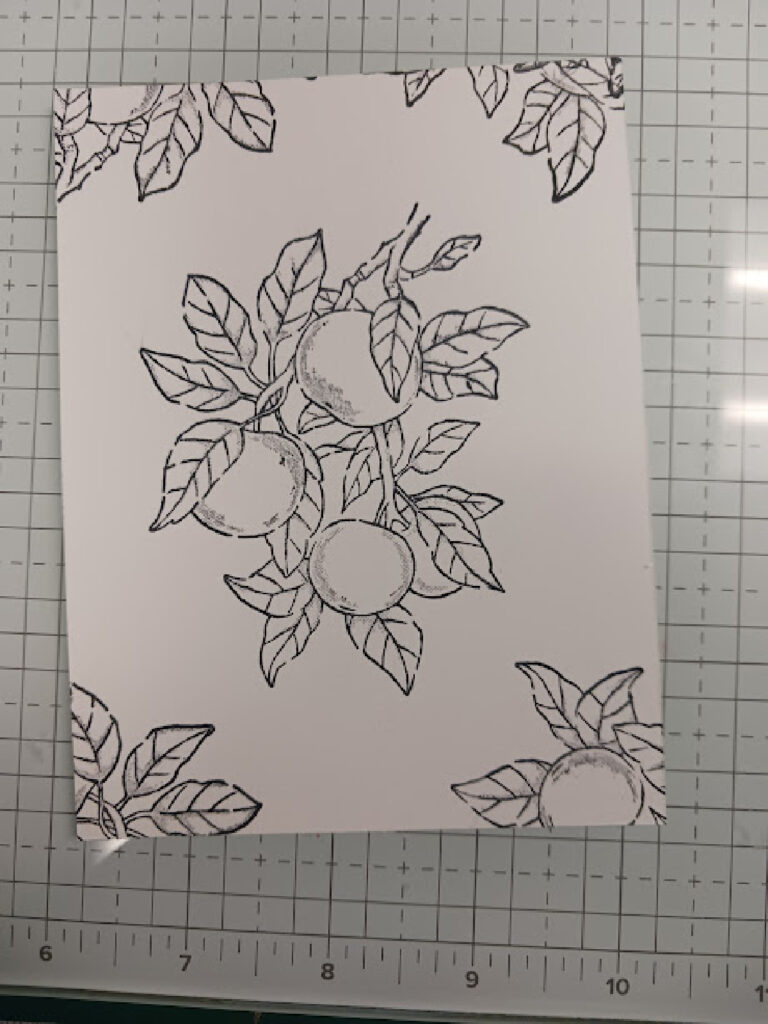
Stamp the apple images from the Apple Harvest stamp set in Memento Black ink on the Basic White layer
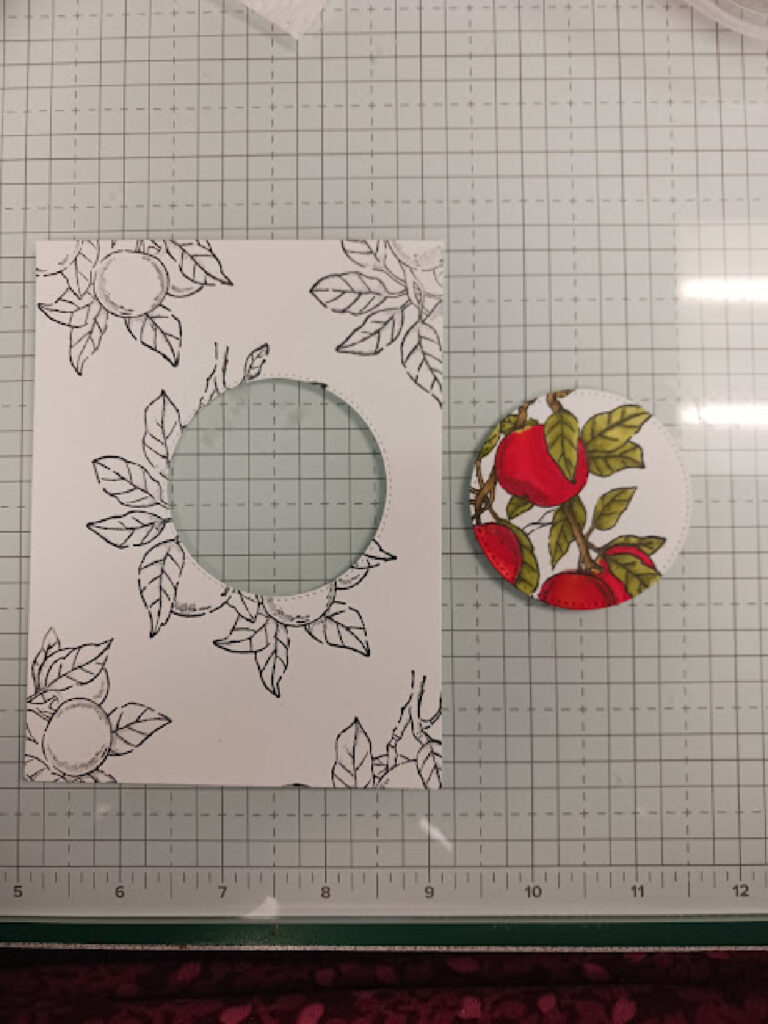
Use the 3rd largest circle die and die cut out the portion of the image you want to spotlight
Color only the image that was die cut, with Stampin Blends. I used light and dark Real Red, light and dark Sweet Sorbet, light and dark Old Olive and light Daffodil Delight
Attach the Basic White card layer to the card base with liquid glue
Place the colored image back into the hole of the Basic White layer with dimensionals, making sure to line it up exactly
On a strip of Basic White cardstock cut at 1/2″ x 4″, stamp a sentiment from the Apple Harvest stamp set in Memento Black ink
Cut a strip of Real Red card stock 5/8″ x 4 1/8″ and layer under the Basic White layer with liquid glue. Add the sentiment to the card with dimensionals
Color some of the white Classic Matte Dots, red using the Real Red Stampin Blend and place them on the finished card
#4 Basic White layer stamped#6 circle removed and colored#8 color circle inserted
Now hop over and see all the other great cards
Have you been inspired and want to try out this technique, then click here to go to my Online store and get the products I used for this card. Be sure to use this month’s Host Code A6BFXASN and receive a FREE package of Basic Rhinestones.
If you live in Canada
and would like to receive the new 2024-2025 Annual catalogue coming out in May and do not have a Demonstrator, click below and fill out the form
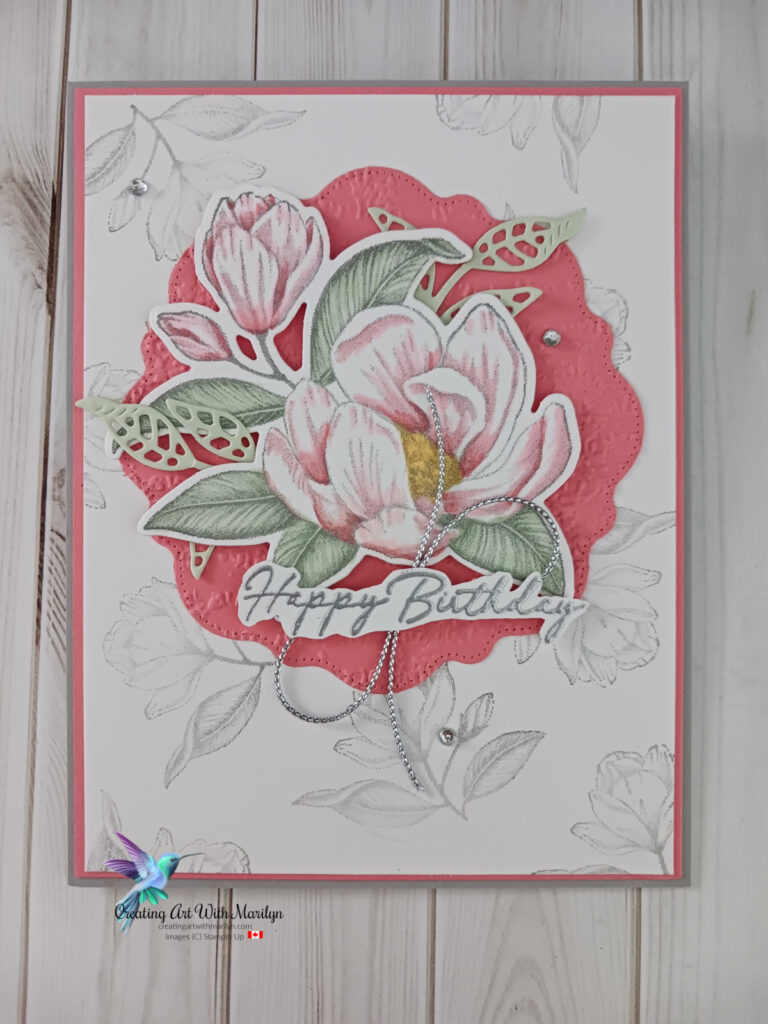
Have you seen the Magnolia Mood Bundle found in the Online Exclusives yet? This bundle is so much fun to play with and coloring it makes you feel like an artist! I colored this Magnolia in Flirty Flamingo, Soft Sea Foam and Daffodil Delight Stampin Blends. The die cut layer is from the Thoughtful Expressions dies and cut in Flirty Flamingo cardstock and embossed with the Timeworn Type 3D embossing folder. The background is stamped off in Smoky Slate ink. The sentiment is from the Magnolia Mood stamp set, heat embossed with Silver embossing powder. The embellishments are the Silver Simply Elegant Trim and Basic Rhinestones. For complete details read more
Posted inUncategorized|Comments Off on Magnolia Mood – Flirty Flamingo – Happy Birthday
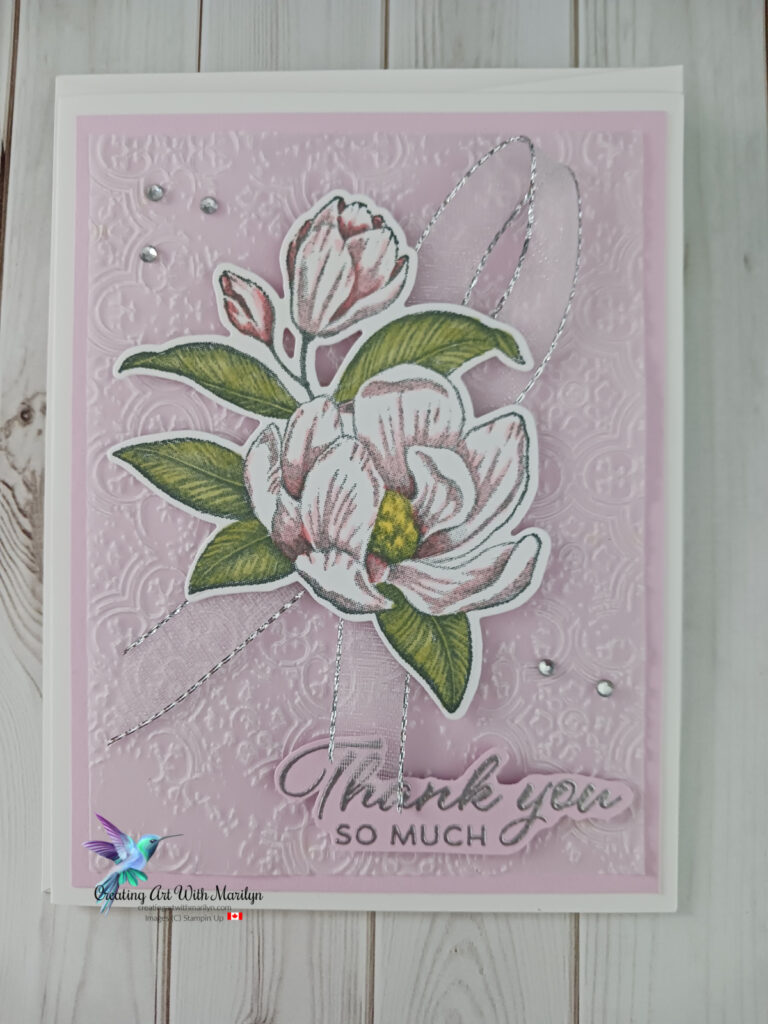
The Magnolia Mood Bundle is so much fun to play with, I can’t seem to get enough of it. The flowers are so easy to color with Stampin Blends. This Magnolia is colored with Bubble Bath, Granny Apple Green and Daffodil Delight. The vellum (which is retiring soon) is embossed with the Quatrefoil Tile embossing folder (also retiring). The ribbon is the Silver and White 1/2″ Sheer Ribbon. The sentiment is from the Layering Leaves stamp set and is heat embossed with Silver embossing powder then fussy cut. Basic Rhinestones are scattered on the card to finish it. For complete instructions to create this card read more
Posted inUncategorized|Comments Off on Magnolia Mood – Bubble Bath – Thank You Card
The Magnolia Mood Bundle, found in the Online Exclusives, is one of my favorite stamp sets to color using Stampin Blends. This card was colored with light and dark Petal Pink, light and dark Soft Sea Foam and light Daffodil Delight. The image is stamped in Smoky Slate, giving it a softer look. The Petal Pink die cut is from the Thoughtful Expressions dies. The ribbon is the Silver and White 1/2″ Sheer Ribbon also found in the Online Exclusives. The sentiment is from the Go To Greetings and will soon be retiring. It is heat embossed with Silver embossing powder. For complete instructions and products read more
Posted inUncategorized|Comments Off on Magnolia Mood – Petal Pink – Just A Note
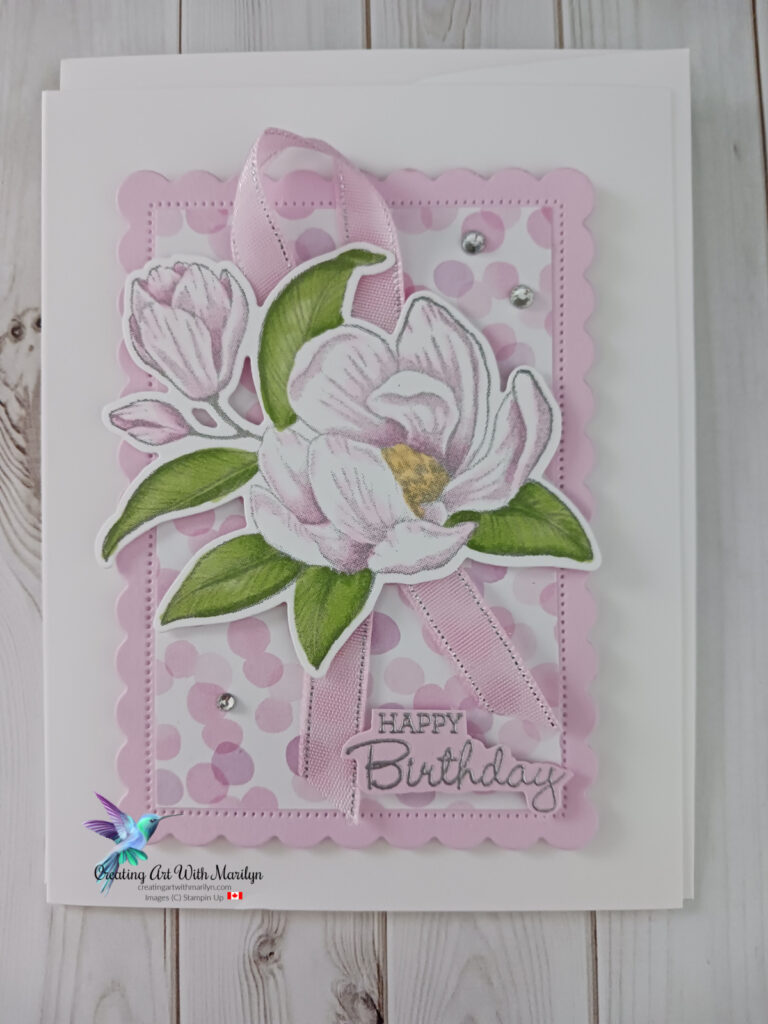
I love to color with my Stampin Up Blends and the New Magnolia Mood Bundle, found in the Online Exclusives, takes coloring to the next level. For this card I used the light and dark Bubble Bath, light and dark Granny Apple Green and dark Daffodil Delight. The Designer Series Paper is the Bright and Beautiful 6×6 and the ribbon is the Bubble Bath from the 3/8″ Sheer Ribbon Combo pack. The sentiment is from the Pansy Patch stamp set and heat embossing with Silver Embossing Powder. I must give Angela McKay from North Shore Stampers credit for the idea of this card and I put my twist on it. For complete details read more
Posted inUncategorized|Comments Off on Magnolia Mood – Bubble Bath – Happy Birthday Card
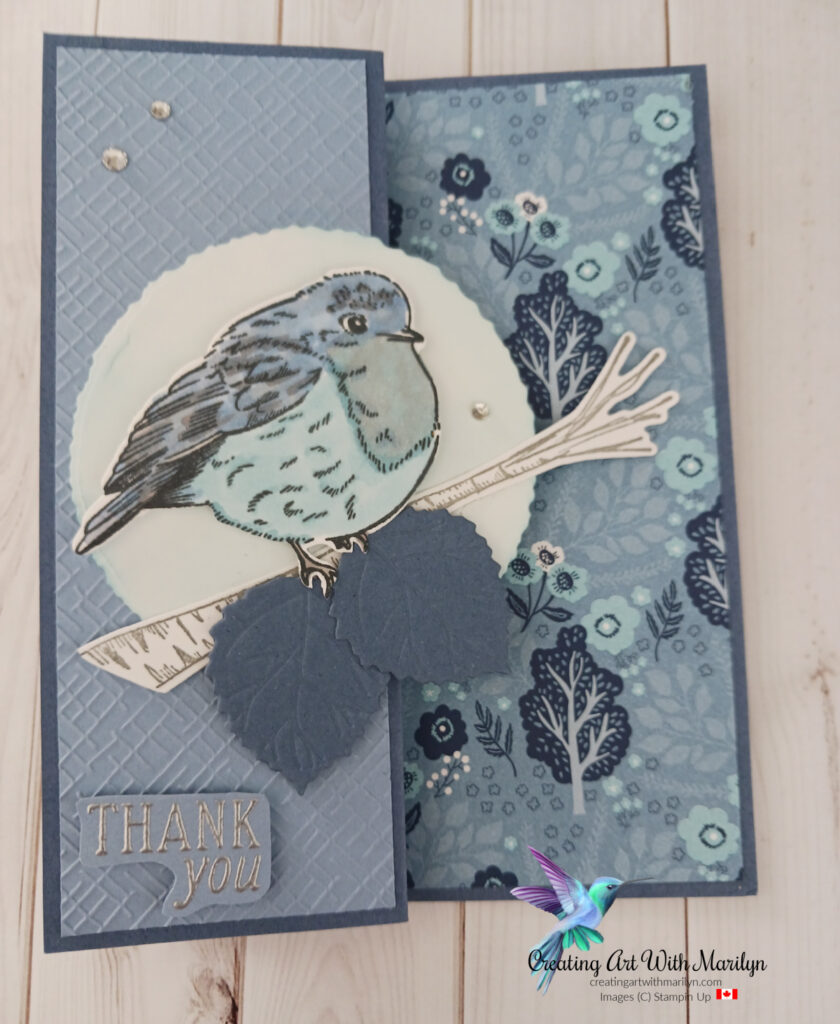
I am so pleased to once again be able to participate in Kylie Bertucci’s International Top Ten Winners Blog Hop. Thank you to everyone that took the time and voted for my card. My card was voted #7. With your votes, I am able to participate in the Winners Blog Hop with the Top Ten Winners for the month of March. I am using the Perched In A Tree and the Countryside Designer Series Paper to create this card.
Products I used to create this cards:
Stamps – Perched In A Tree, Inked and Tiled – (retiring soon)
Dies – Aspen Trees (retiring soon), Deckled Circles
Embossing Folder – Basic 3D Thatched
Paper – Countryside Inn Designer Series Paper
Embossing Powder – Silver
Embellishments – Basic Rhinestones
Card Stock – Basic White, Balmy Blue and Misty Moonlight
For complete cutting and instructions to create this card read more
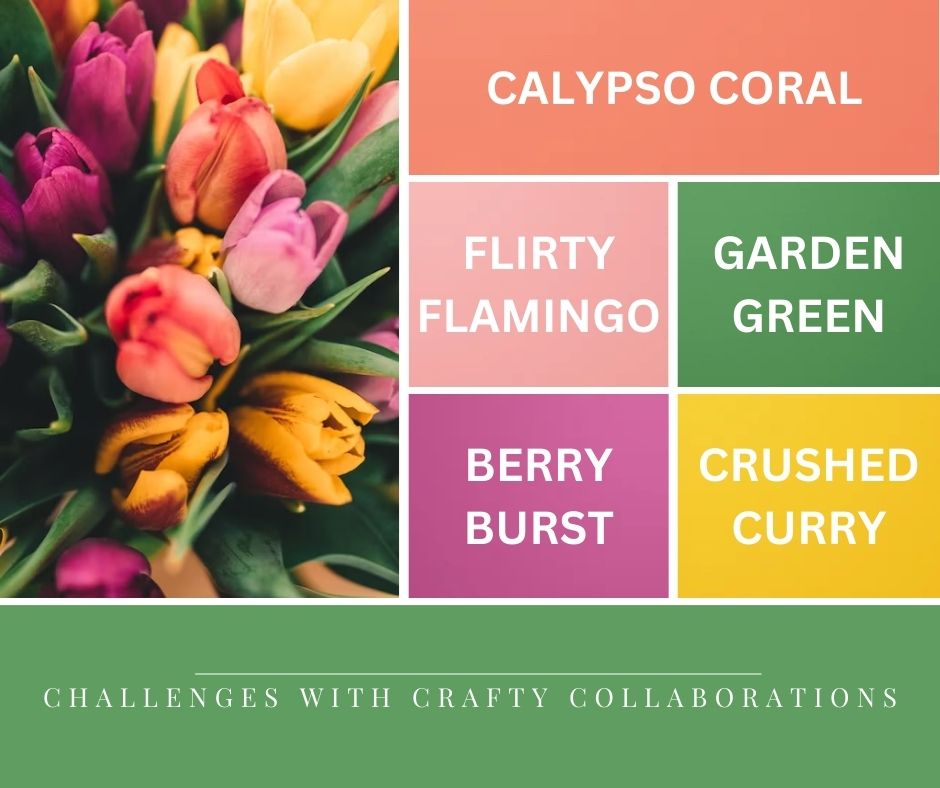
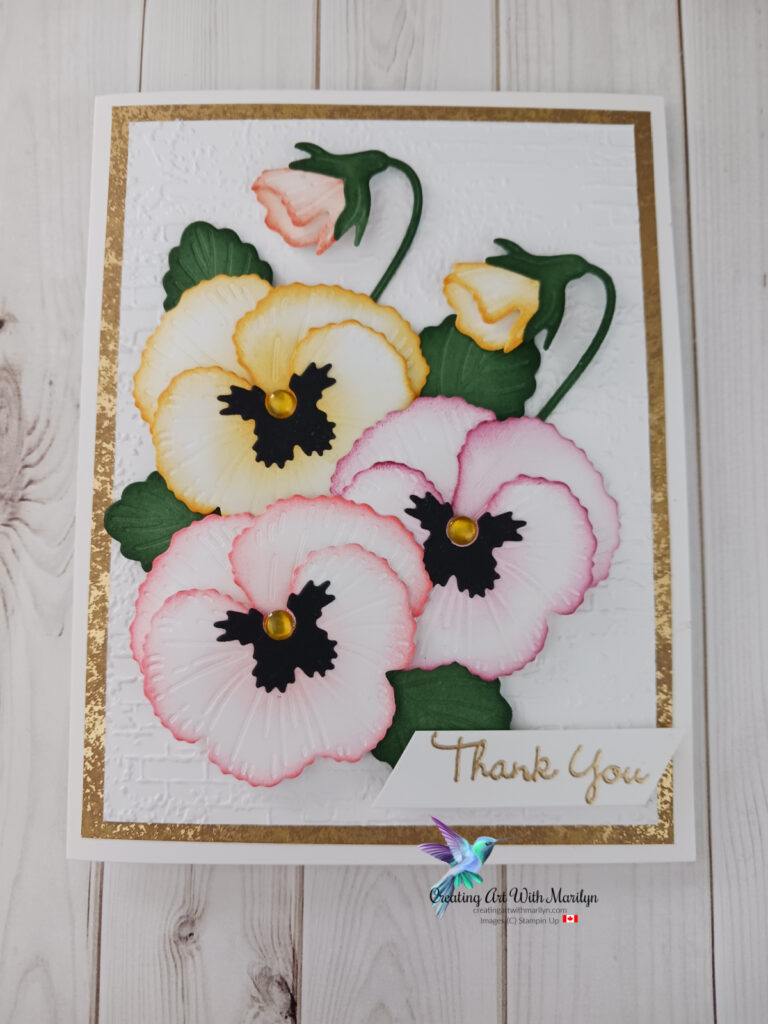
I am so excited to be able to participate in the March Crafty Challenge Blog Hop. This challenge was a Color Challenge, where you pick colors to create your card.
For this challenge I decided to use a favorite bundle of mine the Pansy Patch ( which I can sadly say will be retiring soon, and I was able to incorporate all the colors, Calypso Coral, Flirty Flamingo, Berry Burst, Crush Curry and Garden Green.
These are the products I used to create this card:
Stamps – Pansy Petals
Dies – Pansy Dies
Embossing Folder – Exposed Brick
Specialty Paper – Distressed Gold Paper
Inks – Calypso Coral, Flirty Flamingo, Berry Burst, Crush Curry and Garden Green
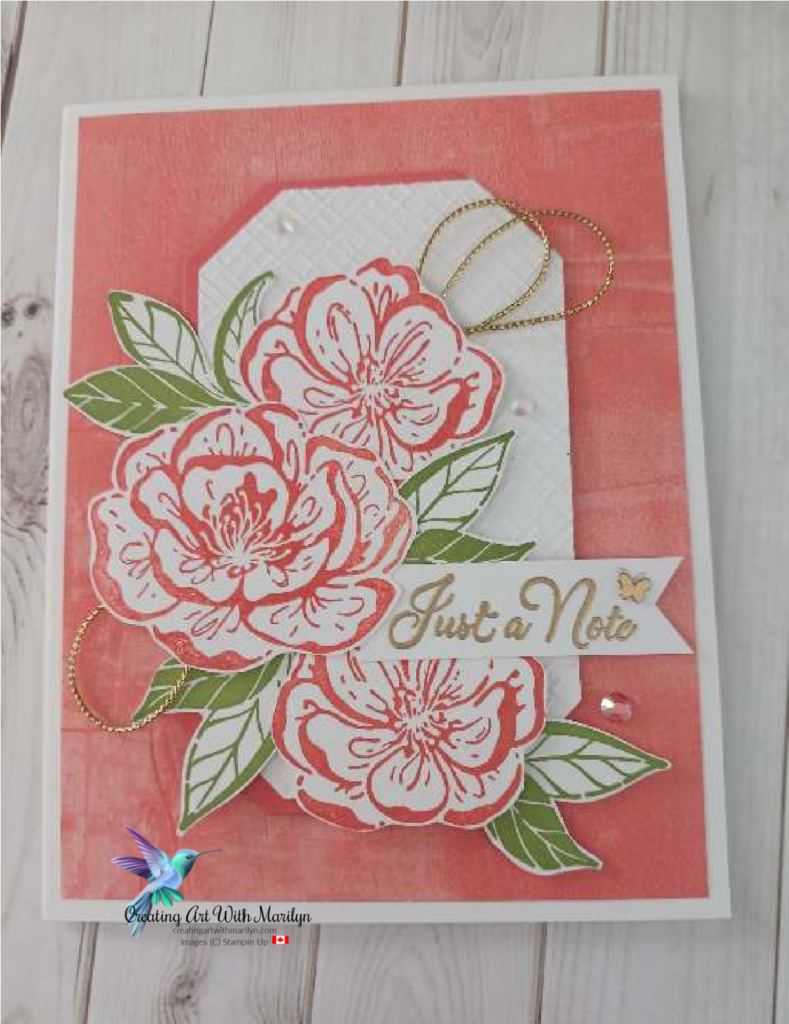
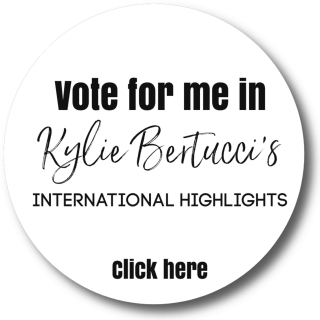
I am so excited to once again participate in Kylie Bertucci’s International Card Challenge. This card challenge is made up of very talented Demonstrators from all around the World, who create amazing cards and you get to vote and pick your favorite cards and later on in the month, the Top Ten Winners get to participate in an International Blog Hop.
I wanted to use one of my favorite stamp sets from the Online Exclusives. This bundle is called the Irresistible Blooms. I stamped the flowers in Calypso Coral and the leaves in Old Olive. The die cut layer is the Countryside Corners and embossed with the Thatched Basic 3D embossing folder. Don’t forget to check the Online Exclusive Products as there are some great products and they will never appear in a catalogue.
I would really appreciate it, if you would take some time and vote for my card. Click on the image below to get the link to vote.
Cutting and Instructions to complete is card:
Card base is Basic White card stock, cut at 8 1/2″ x 5 1/2″ scored and folded at 4 1/4″
Cut a Delightful Floral Designer Series Paper at 4″ x 5 1/4 ” and adhere it to the card base with liquid glue
Die cut a piece of Basic White and Calypso Coral card stock with the same Countryside Corner die
Emboss the Basic White layer die with the Thatched 3D Basic Embossing folder
Off set the 2 layers and glue them together with liquid glue
Pop this layer onto the card base with dimensionals
On a piece of Basic White card stock, stamp some flowers from the Irresistible Blooms in Calypso Coral and the leaves in Old Olive.
Die cut the images out with the matching Irresistible Bloom dies
Arrange the flowers and leaves the way you want them on the card
Before adding the flowers and leaves to the card, make a couple of large loops using the Gold Simply Elegant Trim and attach to the back of the flowers
Place the flowers and leaves to the card with dimensionals
Stamp a sentiment from the Go To Greeting in Versa Mark and then heat emboss with Gold embossing powder
Flag the one end and add to the card
Add a Brushed Brass Butterfly and some Iridescent Rhinestones to the finished card
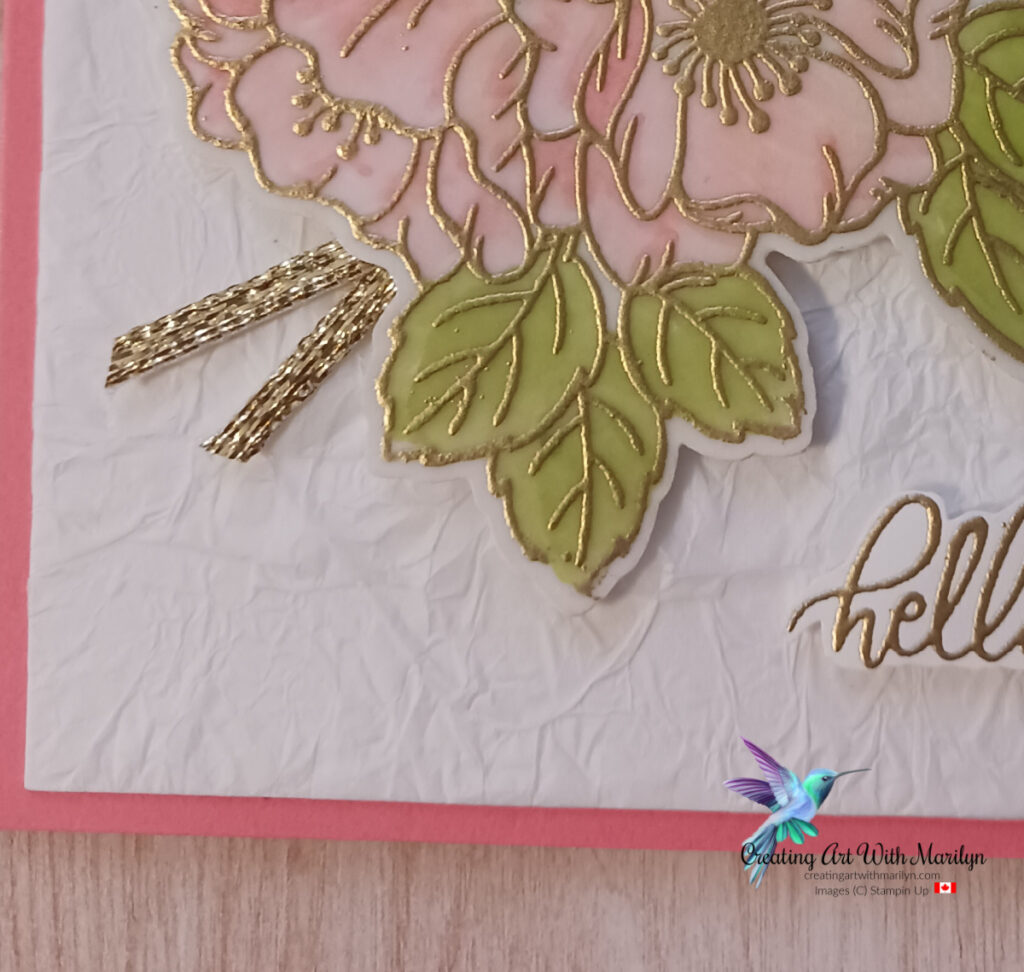
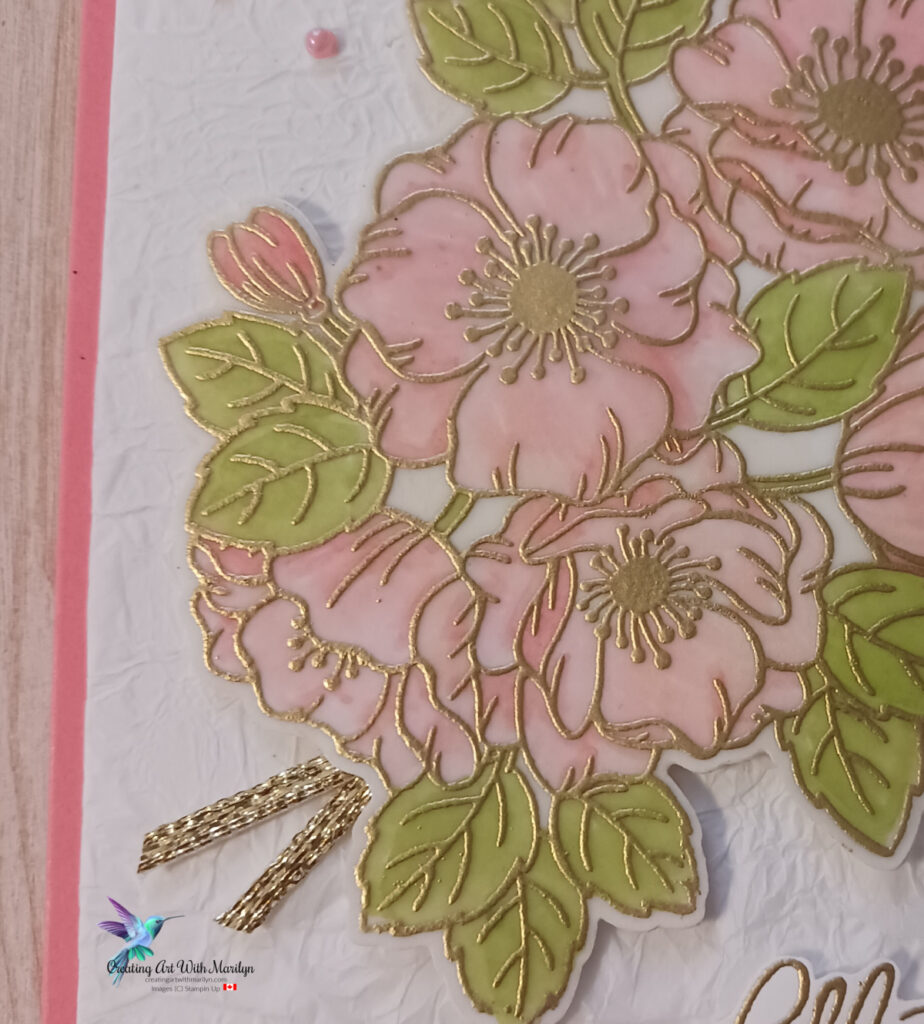
I am so pleased to once again be able to participate in Kylie Bertucci’s International Top Ten Winners Blog Hop. Thank you to everyone that took a little time in their busy day and voted for my card. My card was voted #9. With your votes, I am able to participate in the Winners Blog Hop with the Top Ten Winners for the month of February. I am using the Enduring Masks Bundle from the Jan – April 2024 Mini Catalogue and did a great technique with this card as well.
Products I used to create this card:
Stamps – Enduring Beauty
Dies – Enduring Beauty
Specialty Paper – Vellum
Embossing Powder – Gold
Stampin Blends – Flirty Flamingo and Granny Apple Green
Card Stock – Flirty Flamingo and Basic White
Embellishments – Brushed Brass Butterflies, Gold & Silver 1/8″ Trim and Blooming Pearls
Close Up Tissue Paper LayerClose Up Gold Embossing
For complete instructions and products used for this card read more:
Now check out the other Top Ten International Winners
Hi my name is Marilyn Pearen and I live in Prince George, British Columbia Canada. I have been a Stampin’ Up Demonstrator for 7 years now. Gosh how time flies when you are having fun and enjoying what you do. I decided to become a demonstrator to share my passion and love for card making.
All contents (including text, photographs and images are sole responsibility of Marilyn Pearen as I am an Indepentent Stampin Up! Demonstrator. The use of any contents, services, classes or products offered on this blog are not endorsed by Stampin Up! It is shared for personal use only. No contents may be removed , duplicated or copied for distribution or advertisement without permission.https://festivefridaychallenge.com/


")
")


 Designer Series Paper")


")